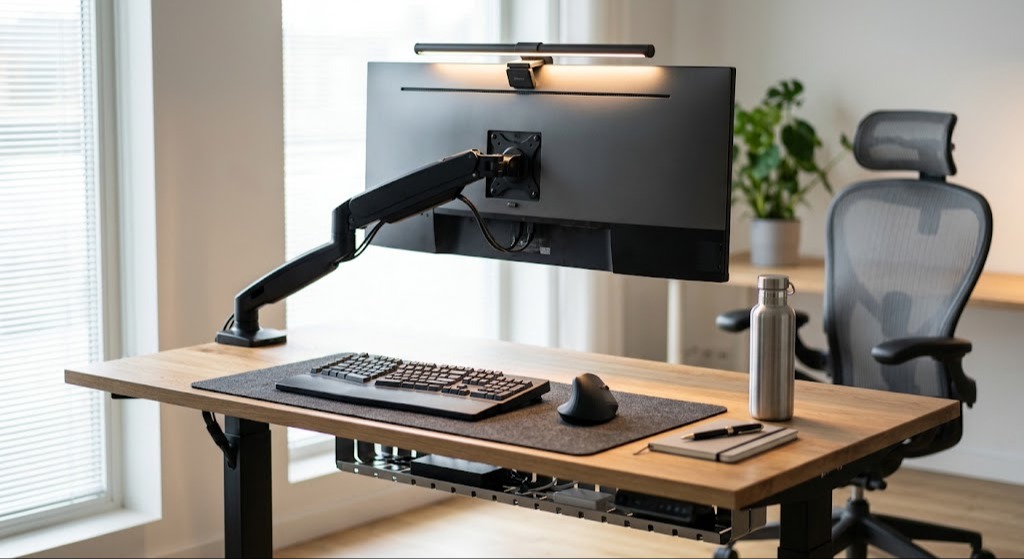
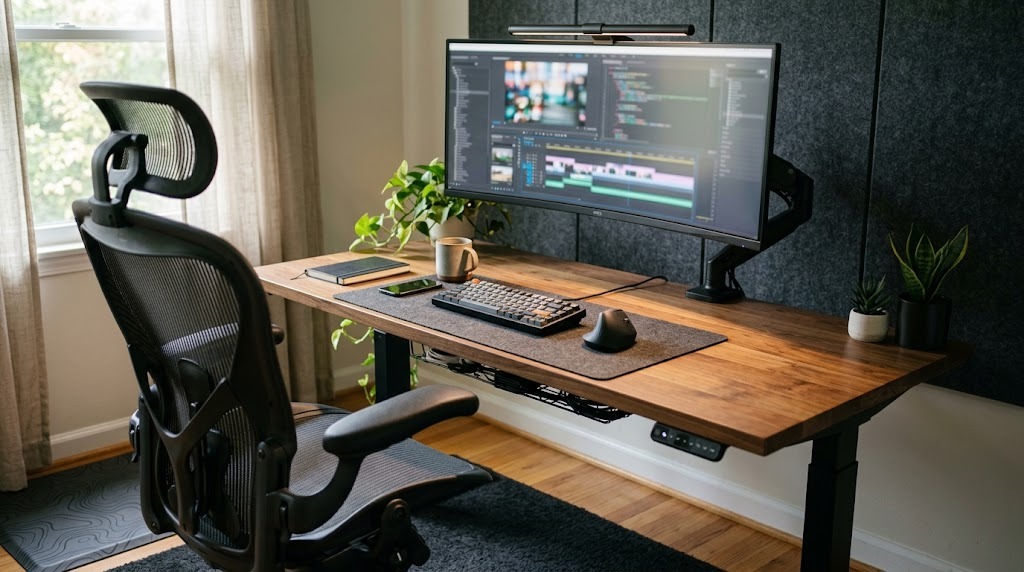
An office desk setup is the engineered arrangement of furniture, computing hardware, peripheral devices, and ambient environmental controls tailored to an individual’s physical anatomy and task workflow. An optimized workstation aligns human biomechanics with physical equipment to neutralize musculoskeletal strain, eliminate visual fatigue, and maximize sustained cognitive performance.
+-------------------------------------------------------------------------+
|                       WORKSTATION ALIGNMENT SUMMARY                     |
+-------------------------------------------------------------------------+
|  Monitor Position    | Top 1/3 of panel level with resting eye gaze     |
|  Focal Distance      | 20 to 30 inches (arm's length to fingertips)     |
|  Elbow Joint Angle   | 90° to 105° open angle; forearms parallel to floor|
|  Wrist Articulation  | 180° neutral plane; no dorsiflexion or pronation  |
|  Popliteal Clearance | 2 to 3 fingers clearance behind the knee crease  |
|  Hip/Knee Alignment  | 90° to 100°; thighs horizontal; feet planted flat|
+-------------------------------------------------------------------------+
Key Facts: Workspace Optimization at a Glance
- Neutral Posture Standard: Based on ANSI/HFES 100-2007 standards, an ergonomic setup preserves the spine’s natural “S” curvature by maintaining hip, elbow, and knee angles between 90 and 105 degrees.
- Cervical Spine Physics: Tilting the head forward just 15 degrees increases gravitational load on the cervical spine from 10–12 pounds to roughly 27 pounds; a 30-degree tilt elevates that load to 40 pounds.
- The Fixed-Desk Mismatch: Standard commercial desks measure 29 to 30 inches high—a dimension engineered to fit the 95th percentile of 1950s males (roughly 6’0″ individuals). Anyone shorter than 5’10” requires an adjustable surface or a calibrated footrest to prevent shoulder elevation.
- Visual Ergonomic Plane: The center of your screen should sit 15 to 20 degrees below horizontal eye level to accommodate the eye’s natural resting vergence and down-gaze reading mechanics.
- Sit-to-Stand Metabolic Cadence: Ergonomic research confirms static standing creates equal or greater vascular stress than static sitting. The optimal cadence is 45 minutes of seated work followed by 15 minutes of standing per hour.
What Are the Core Ergonomic Principles of an Office Desk Setup?
The foundation of every high-performance office desk setup is biomechanical neutrality: placing joints in positions that minimize mechanical load, muscular effort, and tendon strain. Understanding these principles prevents chronic repetitive strain injuries (RSIs) and musculoskeletal disorders (MSDs).
                      VISUAL & SKELETAL KINEMATICS

                    [ Resting Horizontal Eye Level ]
                                   \  -15° to -20° Gaze Angle
                                    v
     [ Cervical Spine ] ------> [ Monitor: 20-30" Away ]
             |
     [ Lumbar Curve: L1-L5 ] -> Supported by lumbar pad (100-110° recline)
             |
     [ Forearms/Elbows ] -----> 90-105° open; wrist flat in Primary Zone
             |
     [ Thighs/Knees ] --------> Horizontal; 2-3" gap behind popliteal fossa
             |
     [ Feet ] ----------------> Firmly supported on floor or angled footrest
The Kinetic Chain of Seated Posture
Human posture functions as an interconnected kinetic chain; an adjustment at one joint produces immediate structural compensations throughout the entire skeletal framework.
When a desk surface is positioned two inches too high, you must elevate your shoulders (scapular elevation) and flare your elbows outward (shoulder abduction) to place your hands on the keyboard. This continuous contraction travels into the upper trapezius and levator scapulae, producing chronic myofascial trigger points, cervical tension, and tension-type headaches.
If a chair lacks proper lumbar support, the pelvis rotates backward (posterior pelvic tilt), flattening the lordotic curve of the lumbar spine (L1–L5 vertebrae). This pelvic rotation forces the thoracic spine into excessive kyphosis (slouching), pushing the head forward past the center of gravity.
For every inch the head projects forward, the cervical extensors handle roughly double the functional load, leading to nerve impingements, numbness down the arm (cervical radiculopathy), and persistent back strain.
The Science of Optical Focus and Convergence
Visual fatigue—clinically designated as Computer Vision Syndrome (CVS) or digital eye strain—is driven by two primary ocular systems: accommodation (lens focus) and vergence (eye inward rotation).
+---------------------+-------------------------+-------------------------+
| Optical Metric      | Anatomical Baseline     | Workstation Target      |
+---------------------+-------------------------+-------------------------+
| Resting Vergence    | 30 to 45 inches away    | Monitor placed 20 to 30"|
| Downward Gaze Angle | 10° to 25° below center | Top bezel at eye level  |
| Contrast Ratio      | Natural ambient daylight| 1:3 screen-to-desk lux  |
| Blink Rate          | 15 to 20 times per min  | Conscious resets (6-8)  |
+---------------------+-------------------------+-------------------------+
When looking straight ahead at the horizon, your eyes operate at parallel sight lines. When reading closer objects, your eyes converge inward and the ciliary muscle contracts to focus the lens.
Mounting a monitor too high strains your ocular motor muscles by demanding upward convergence while forcing your eyelids wider open, which accelerates tear evaporation and dry eye disease. Positioning your screen 20 to 30 inches away and 15 to 20 degrees below horizontal eye level matches your eye’s physiological rest state, significantly reducing ocular fatigue.
How Should Reach Zones Be Configured for Maximum Efficiency?
Reach zones organize the desk surface by frequency of physical contact, minimizing joint extension, torso twisting, and shoulder strain during daily tasks.
                            DESK REACH TOPOLOGY

     +---------------------------------------------------------------+
     |                       TERTIARY REACH ZONE                     |
     |          (Storage, ambient lighting, decor: 24"-36")          |
     |                                                               |
     |      +-------------------------------------------------+      |
     |      |               SECONDARY REACH ZONE              |      |
     |      |       (Notepad, beverage, phone: 14"-18")       |      |
     |      |                                                 |      |
     |      |      +-----------------------------------+      |      |
     |      |      |        PRIMARY REACH ZONE         |      |      |
     |      |      |   (Keyboard, mouse: within 14")   |      |      |
     |      |      +-----------------------------------+      |      |
     |      +-------------------------------------------------+      |
     +---------------------------------------------------------------+
                                  [ User ]
Primary Reach Zone (Immediate Reach: 0 to 14 inches)
The primary zone covers the sweep of your forearms when your upper arms hang naturally at your sides with elbows bent at 90 degrees. This space is reserved strictly for high-frequency input tools: your keyboard and mouse.
No items outside of these two peripherals should live here. Reaching forward beyond 14 inches to type causes forearm pronation and shoulder flexion, leading to rotator cuff irritation and repetitive strain.
Secondary Reach Zone (Arm’s Reach: 14 to 24 inches)
The secondary zone encompasses the arc formed by sweeping your entire arm forward from the shoulder without bending your torso or leaning your spine.
Place intermittent-use tools in this zone: your mobile device, reference notebooks, physical switches, coffee mug, and stream deck or macro pad. Accessing these items requires single-joint articulation without compromising spinal posture.
Tertiary Reach Zone (Extended Reach: 24 to 36+ inches)
The tertiary zone covers the outer limits of your desk surface, requiring shoulder extension or waist bending to reach.
Store low-frequency and static gear here: secondary webcams, desktop speakers, lighting fixtures, cable management access trays, and paper archives. Never place objects you use more than twice an hour in the tertiary zone, as frequent leaning compromises lumbar contact with your chair.
Step-by-Step: How to Build and Calibrate an Office Desk Setup
Building an ergonomic workspace requires a bottom-up methodology. Calibrate your chair to your body first, set your desk height to your arms second, and place your monitors to match your gaze last. Adjusting a desk before setting your chair locks in postural errors.
       CALIBRATION SEQUENCE: BOTTOM-UP ERGONOMIC ANCHORING

    [ Step 1: Chair ]   ---> Align seat height, depth, and lumbar support
            |
    [ Step 2: Desk ]    ---> Match desk surface to resting seated elbow height
            |
    [ Step 3: Display ] ---> Set distance (20-30") and screen height
            |
    [ Step 4: Periph ]  ---> Align mouse/keyboard in Primary Reach Zone
            |
    [ Step 5: Cables ]  ---> Anchor power distribution and wire routing
Step 1: Calibrate the Ergonomic Chair
Your chair sets the baseline for the entire workspace. Adjust its settings before adjusting any other piece of furniture:
- Popliteal Seat Height: Stand in front of your chair; adjust the seat pan apex so it sits just below your patella (kneecap). Sit down with your feet flat on the floor wearing typical footwear. Adjust until your hips and knees form a 90 to 100-degree angle with your thighs parallel to the ground.
- Seat Pan Depth: Slide the seat pan forward or backward until you can place 2 to 3 fingers (approximately 1.5 to 2 inches) of clearance between the front edge of the seat cushion and the back of your knee (popliteal fossa). This preserves popliteal vascular flow and prevents deep-vein thrombosis risks.
- Lumbar Contour Positioning: Move the lumbar support vertically until the firmest part of the curve nestles directly into the small of your back—the lordotic curve of the lumbar spine (L1–L5 vertebrae).
- Armrest Calibration: Drop your shoulders into a relaxed, neutral posture and bend your elbows to 90 degrees. Raise the armrests until they barely touch the lower margins of your forearms without pushing your shoulders upward.
Success Checkpoint: Your feet rest flat on the floor with zero downward pressure on the undersides of your thighs, and your lower back feels firmly supported without tipping forward.
Step 2: Calibrate the Desk Working Surface
With your chair set, adjust your desk surface to fit your arm position:
+--------------------+-----------------------+-----------------------+
| User Stature (ft)  | Seated Elbow Ht (in)  | Target Desk Ht (in)   |
+--------------------+-----------------------+-----------------------+
| 5'2" (157 cm)      | 22.0" - 23.5"         | 23.0" (Needs footrest)|
| 5'6" (168 cm)      | 24.5" - 25.5"         | 25.0" (Needs footrest)|
| 5'10" (178 cm)     | 26.5" - 27.5"         | 27.0" (Below standard)|
| 6'2" (188 cm)      | 29.0" - 30.5"         | 30.0" (Matches 30")   |
+--------------------+-----------------------+-----------------------+
- Elbow-to-Desk Alignment: Sit close to the desk with your shoulders relaxed. Your desk surface should match your resting elbow height. If you use a sit-stand motorized desk, program this exact seated elevation into Memory Preset 1.
- The Fixed Desk Remediation: If your desk is fixed at 29 or 30 inches and you are under 6’0″, raise your chair until your forearms rest parallel to the desk surface. Then, place an adjustable, angled footrest under your feet to restore the 90-degree angle at your knees and prevent your legs from dangling.
Success Checkpoint: Your wrists rest completely flat (neutral 180 degrees) without bending upward or downward when your fingers touch the home row of your keyboard.
Step 3: Position the Visual Display
Correct monitor alignment prevents upper back fatigue, forward head posture, and visual strain:
- Focal Distance: Sit back in your calibrated chair. Extend your arm forward with an open palm; your fingertips should lightly touch the screen surface, setting the display roughly 20 to 30 inches away.
- Vertical Elevation: Position the top third of your display glass at or slightly below your resting horizontal eye level. When looking at the center of the display, your eyes should angle downward by 15 to 20 degrees.
- Progressive Lens Adjustment: If you wear bifocal or progressive lenses, lower your monitor by an additional 2 to 3 inches and tilt the bottom of the screen toward you by 10 to 15 degrees to prevent you from tilting your head backward to see through the bottom of your lenses.
Success Checkpoint: You can read text across the entire display without tilting your chin upward or bending your neck forward.
Step 4: Position Peripheral Inputs
Input peripherals should keep your wrists and hands in a relaxed, neutral alignment:
- Keyboard Placement: Center the spacebar with your belly button if you use a tenkeyless (TKL) or compact keyboard. If using a full-sized keyboard with an integrated number pad, shift the board slightly rightward so the “G” and “H” keys align with your torso’s vertical midline.
- Mouse Placement: Place your mouse adjacent to your keyboard in the primary reach zone. If you experience forearm tightness, switch to a vertical ergonomic mouse with a 57-degree vertical grip angle, which keeps your radius and ulna bones in a relaxed, parallel position rather than crossing them.
- Keyboard Incline: Retract the rear flip-out feet under your keyboard. Elevating the rear of a keyboard forces your hands into wrist extension, which increases carpal tunnel pressure. Keep the board flat or use a negative-tilt tray that slopes gently downward away from you.
Success Checkpoint: Your shoulders hang loose without hunching, your elbows stay close to your torso, and your wrists glide smoothly without bending backward.
Step 5: Route Cables and Power Distribution
Effective cable routing keeps sit-stand desks safe and maintains a clear, organized workspace:
        DESK SURFACE (Monitors, Lamp, Laptop Hub)
                         |
      [ Downward Bundle via Spine / Neoprene Sleeve ]
                         |
      [ Under-Desk Cable Tray / Mounted PDU ]
          |               |               |
   [DisplayPower]   [SystemBricks]   [MonitorArms]
                         |
       [ Service Slack Loop: Minimum 18" Travel ]
                         |
          WALL OUTLET / UNINTERRUPTIBLE POWER SUPPLY
- Mount Central Power Under-Desk: Attach a commercial-grade surge-protected power distribution unit (PDU) directly to the underside of the desk frame or desktop. Plug all desktop devices—monitors, computers, desk lamps, and chargers—directly into this under-desk unit.
- Manage the Ground Slack Drop: Route only a single heavy-gauge power cable and one ethernet cable down from the desk to the wall outlet. Encase these lines in an articulated cable spine or braided flexible sleeve.
- Calibrate Extension Slack: Raise your motorized standing desk to its highest standing limit. Verify that the downward cable bundle retains 12 to 18 inches of slack to ensure cords do not stretch, loosen, or snap during height adjustments.
Success Checkpoint: The desk moves smoothly from its lowest seated position to its highest standing setting without catching cords or tugging wall connections.
What Are the Four Main Office Desk Setup Archetypes?
Selecting the right desk setup archetype aligns your physical workspace with your work demands, cognitive workflow, and available room dimensions.
+--------------------------+----------------------------+-----------------------------+
| Archetype                | Primary Hardware Focus     | Recommended For             |
+--------------------------+----------------------------+-----------------------------+
| 1. Ergonomic Minimalist  | Single 4K screen, 65% KB   | Deep focus, writers, devs   |
| 2. Multi-Monitor Pro     | Dual 27" / 49" Ultrawide   | Finance, editing, analytics |
| 3. Active Sit-Stand      | Dual-motor, balance mat    | Long shifts, back pain relief|
| 4. Hybrid Laptop Hub     | Calibrated dock, riser     | Mobile corporate workers    |
+--------------------------+----------------------------+-----------------------------+
1. The Ergonomic Minimalist Setup
The Ergonomic Minimalist archetype emphasizes clean lines and zero visual distractions, making it ideal for deep, focused work such as writing, architecture, and programming.
       MINIMALIST TOPOLOGY (48" x 24" to 60" x 30")

       +---------------------------------------------+
       |             [ 27"-32" 4K Monitor ]          |
       |               (Single Gas Arm)              |
       |                                             |
       |         +-------------------------+         |
       |         |     Wool/Felt Desk Mat  |         |
       |         |  [TKL/65% KB] [VertMouse]|        |
       |         +-------------------------+         |
       |                                             |
       +---------------------------------------------+
- Core Hardware Architecture: A single 27-inch or 32-inch 4K high-density display mounted on a gas-spring monitor arm; a compact 65% or 75% mechanical keyboard; a wireless ergonomic mouse; and a natural felt or leather desk mat.
- Biomechanical Trade-offs: Maximizes focus by keeping only essential tools in your visual field. However, it limits screen real estate, requiring frequent digital window switching during complex, multi-source tasks.
- Target Footprint: 48″ wide x 24″ deep up to 60″ wide x 30″ deep.
2. The Multi-Monitor Power User Setup
This configuration suits data-dense workflows such as financial modeling, day trading, complex software engineering, and multi-track audio/video post-production.
     DUAL DISPLAY GEOMETRY: ASYMMETRIC VS. SYMMETRIC

        ASYMMETRIC (RECOMMENDED)            SYMMETRIC (EQUAL WORK)
          [ Secondary 24-27" ]               [ Monitor 1 ] [ Monitor 2 ]
                   \                                \     /
     [ Primary 27-32" Display ]                       \ /
                 |                                  Center Bezel
              [ User ]                              [  User  ]
    (Head points straight ahead)           (Causes continuous neck turns)
- Core Hardware Architecture: Dual 27-inch monitors positioned horizontally, or a single 40- to 49-inch curved ultrawide (1800R or 1000R curvature) to keep the display edges within your field of view; a high-bandwidth Thunderbolt 4 docking station; a dedicated macro pad; and a heavy-duty dual-arm mounting system.
- Biomechanical Trade-offs: Eliminates digital window toggling but introduces potential neck fatigue from continuous horizontal panning. Avoid symmetric setups where the bezel sits directly in front of you, as this forces you to keep your neck turned all day. Instead, align your primary monitor dead center and angle the secondary display 30 degrees inward on your dominant eye side.
- Target Footprint: 60″ wide x 30″ deep up to 72″ wide x 30″ deep.
3. The Active Sit-Stand Setup
The Active Sit-Stand configuration is built around dynamic movement, ideal for remote workers and individuals managing lumbar disc compression or circulation issues.
       SIT-STAND WORKDAY CADENCE (THE 45/15 PROTOCOL)

       0 min         45 min         60 min
       +---------------+--------------+
       |   45 MIN      |    15 MIN    |  --> Repeat throughout 8-hr shift
       |   SEATED      |   STANDING   |
       | (Deep Focus)  | (Active Mat) |
       +---------------+--------------+
- Core Hardware Architecture: A dual-motor, three-stage motorized lifting desk (travel range: 22.5 to 48.5 inches); a polyurethane anti-fatigue topographic balance mat; and an active-sitting balance stool to engage core muscles throughout the day.
- Biomechanical Trade-offs: Reduces lower back spinal compression, stimulates circulation, and improves metabolic activity. However, static standing for extended periods can cause foot strain and venous pooling. Use a 45-minute seated to 15-minute standing cadence for optimal comfort.
- Target Footprint: 48″ wide x 30″ deep up to 72″ wide x 30″ deep.
4. The Hybrid Laptop Hub Setup
Engineered for professionals who transition between corporate offices, home workspaces, and mobile environments, prioritizing quick docking and reliable ergonomics.
       HYBRID LAPTOP INTEGRATION GEOMETRY

           [ External 27" Display: Primary ]
                          |
      +-------------------+--------------------+
      |                                        |
      |   [ Laptop on Arm ]                    |
      |   (Screen at Eye Ht)                   |
      |   (Secondary Display)                  |
      |            \                           |
      |             \--- [ Thunderbolt Dock ]  |
      |                                        |
      +----------------------------------------+
- Core Hardware Architecture: A commercial laptop riser arm; a dedicated Thunderbolt 4/USB4 single-cable docking station with 85W–100W Power Delivery; an external mechanical keyboard; and a wireless mouse with multi-device pairing.
- Biomechanical Trade-offs: Solves the poor posture caused by working flat on a laptop. However, it requires discipline to dock and mount the laptop rather than working directly on the flat machine.
- Target Footprint: 48″ wide x 24″ deep up to 60″ wide x 30″ deep.
How Do Lighting, Acoustics, and Climate Impact a Setup?
Ergonomics extends beyond physical furniture to include the environmental factors that shape physical comfort and cognitive performance throughout the workday.
                         AMBIENT LIGHTING SCHEMATIC

                         [ Ceiling: Indirect Ambient ]
                                (300-400 Lux)
                                      |
                                      v
       [ Monitor Lightbar ] --------------------> [ Display: 120-150 cd/m² ]
         (Cuts screen glare)                              |
                  |                                       v
                  v                           [ Desk Mat Working Surface ]
         [ Task Lamp: 500 Lux ] <------------ (High Contrast Elimination)
Lighting Architecture and Contrast Balancing
Poor lighting geometry causes pupil dilation fluctuations, leading to headaches, blurred vision, and ocular fatigue. Workstation lighting should be layered across three zones:
- Ambient Room Lighting: Maintain ambient room light between 300 and 400 lux. Avoid unshielded downlights positioned directly above your head, which cast harsh shadows onto your monitor and desk mat.
- Task Surface Luminance: Use a dimmable, high-CRI (Color Rendering Index $\ge 95$) desk lamp or monitor-mounted light bar to illuminate your primary reach zone to 500 lux. Light bars direct light downward in an asymmetrical optical path across your desk surface without washing out your display or reflecting off the glass.
- Screen-to-Environment Contrast Ratio: Balance your display luminance with your immediate surroundings. Maintain a maximum contrast ratio of 1:3 between your active screen and the wall behind it. If you work in a dim environment, add a balanced 6500K bias light behind your monitor to soften this contrast and reduce eye strain.
Acoustic Management and Reverberation
Hard surfaces like bare floors and empty walls reflect sound, raising ambient noise levels and increasing cognitive fatigue during calls.
Place a dense natural wool or low-pile synthetic rug beneath your chair to dampen floor reflections. If your desk sits in a shared or open room, mount dense polyester felt acoustic wall panels (minimum 0.70 NRC—Noise Reduction Coefficient) behind your monitor to absorb high-frequency sounds and improve voice clarity on calls.
Microclimate, Air Quality, and Thermal Balance
Cognitive performance declines significantly when indoor carbon dioxide levels climb above 1,000 parts per million (ppm). Use a dedicated NDIR sensor to monitor CO2, and ventilate your room if levels exceed 800 ppm.
Keep your workspace temperature between 68°F and 72°F (20°C to 22°C) with 40% to 50% relative humidity. Drier air accelerates eye irritation and contact lens discomfort during long screen sessions.
What Are Common Office Desk Setup Mistakes and Diagnostic Fixes?
Symptom 1: Chronic Trapezius Tightness and Occipital Headaches
- The Root Cause: Your desk surface is too high relative to your seated elbow height. This forces you to continuously elevate your shoulders to rest your forearms on the desk, triggering sustained muscle contractions in your trapezius and levator scapulae.
- The Protocol Fix: Drop your desk height until your forearms rest completely level with your keyboard surface. If you use a non-adjustable 29-inch desk, raise your chair until your elbows rest at a 90-degree angle to the surface, and place an angled footrest under your feet to support your legs.
Symptom 2: Carpal Tunnel Numbness or Finger Tingling
- The Root Cause: Your wrists are resting in wrist extension (bent backward toward the forearm), compressing the median nerve against the transverse carpal ligament. This often happens when keyboard incline feet are raised, forcing hands upward.
- The Protocol Fix: Flatten your keyboard feet immediately. If you have an adjustable keyboard tray, tilt the back edge down slightly (negative tilt). This keeps your wrists in a neutral, straight line and opens up the carpal tunnel while typing.
Symptom 3: Midday Plantar Fascia Ache and Low-Back Stiffness
- The Root Cause: You are standing still for hours at a time with locked knees on a hard floor, compressing lumbar spinal joints and placing excessive stress on your feet.
- The Protocol Fix: Move to a 45-minute sitting to 15-minute standing cadence. Stand on a 3/4-inch contoured polyurethane anti-fatigue mat, and shift your weight between your heels and balls of your feet during standing intervals to keep leg muscles engaged.
Hardware Selection Guide: Commercial-Grade Recommendations
Selecting durable, commercially verified hardware is essential to building an ergonomic workspace that lasts. Below are benchmark selections based on real-world adjustability, mechanical reliability, and structural performance.
Ergonomic Seating Benchmarks
- Herman Miller Aeron: The benchmark for task-focused ergonomics. Its 8Z Pellicle elastomeric mesh distributes body weight evenly, eliminates pressure points beneath the ischial tuberosities, and maintains airflow throughout the workday. Choose Size A, B, or C to match your specific frame; the chair relies on a dedicated shell size rather than an adjustable seat pan depth.
- Steelcase Gesture: The top pick for dynamic postures. The Gesture features armrests that rotate 360 degrees to support your forearms whether typing, holding a mobile device, or leaning back. Its flexible core equalizer adapts to your spine automatically as your posture shifts.
Motorized Sit-Stand Surfaces
- Uplift V2 Commercial Desk: Offers exceptional lateral stability thanks to its reinforced lower crossbar and three-stage dual-motor lifting system. It supports up to 355 pounds, adjusts from 22.6 inches to 48.7 inches, and includes built-in mounting points for under-desk cable management trays.
- Desk Top Sizing Standard: Choose a desktop measuring at least 60 inches wide by 30 inches deep. Surfaces narrower than 30 inches make it difficult to achieve the recommended 20-to-30-inch monitor focal distance once a display arm is clamped in place.
Workstation Investment Tiers: Budget Breakdown
Building a workspace requires balancing spend across the core components that support your physical posture and workflow demands.
1. The Entry-Level Tier ($300 to $600)
Focus your budget on a reliable, supportive task chair (such as the Ticova Ergonomic or a certified refurbished office chair) paired with a simple 48″ x 30″ fixed-height desk. Use an adjustable laptop riser stand and an external keyboard and mouse to prevent neck strain, and add an under-desk footrest to ensure your legs are properly supported.
2. The Mid-Range Sweet Spot ($1,000 to $2,000)
This tier delivers the best balance of ergonomics, comfort, and build quality. It features a dual-motor motorized standing desk, a mid-tier ergonomic chair (like the Eurotech Vera or refurbished Steelcase Amia), a 27-inch 4K monitor mounted on a gas-spring arm, and a clean under-desk wire management system.
3. The Enterprise / Professional Tier ($2,500 to $5,000+)
Built for all-day comfort and long-term durability. This setup includes a custom solid-hardwood standing desk (such as Walnut or White Oak on a commercial frame), a premium task chair (Herman Miller Aeron or Steelcase Gesture), an ultrawide or multi-monitor 4K display array on heavy-duty counterbalance arms, a Thunderbolt 4 dock, and custom acoustic wall treatments.
Frequently Asked Questions About Office Desk Setups
What is the ideal desk height for someone who is 5’8″?
For an individual measuring 5’8″, the ideal seated desk height is approximately 25.5 to 26.5 inches. Because standard commercial desks sit at 29 to 30 inches, you will need to lower an adjustable desk, or raise your chair until your forearms are level and place a footrest under your feet to maintain proper leg support.
Is a single ultrawide monitor better than dual monitors?
A single ultrawide monitor is typically better for neck ergonomics because it removes the thick center bezel that forces continuous head turns in symmetric dual-screen setups. Curved ultrawide displays (such as 1800R or 1000R curves) also keep the outer edges of the screen equal distances from your eyes, reducing horizontal neck movement.
How do I know if my monitor is at the correct height?
Sit back in your calibrated chair and look straight ahead at the wall. Your resting horizontal gaze should align directly with the top third of your display glass. If you need to tilt your chin up or down to read lines of text, adjust your monitor arm to match your gaze.
Can I place my desk directly in front of a window?
Placing a desk directly facing a window creates significant visual contrast strain, as bright outdoor light competes with your display’s backlighting. If you position your desk against a window, install adjustable blinds or shear curtains to diffuse the sunlight, or turn your desk 90 degrees so the window is to your side.
How thick should my desk surface be to support a heavy monitor arm?
A desk surface should be at least 0.75 to 1.0 inch thick for solid hardwoods, or at least 1.0 to 1.25 inches thick for high-density particleboard. Avoid thin honeycomb-core desks (like hollow paper-filled tops), as the concentrated clamping force from a heavy monitor arm can crush the surface. If needed, use a steel reinforcement plate under the clamp to spread the weight.
What is the 20-20-20 rule and does it work?
The 20-20-20 rule states that every 20 minutes of screen work, you should look at an object at least 20 feet away for 20 seconds. This brief pause allows your eye’s ciliary muscles to relax from their converged state, lubricating the ocular surface and significantly reducing daily digital eye strain.
The Bottom Line: Sustaining Workspace Performance
An optimized office desk setup is an ongoing ergonomic practice rather than a static piece of furniture. Building a workspace around your body’s natural alignment protects your health, reduces daily physical fatigue, and supports focused cognitive performance throughout your workday.
Begin your workspace upgrade from the floor up: calibrate your chair first to stabilize your spine, set your desk to match your resting elbow height second, position your monitors to align with your natural gaze third, and build the habit of alternating between sitting and standing throughout the week.