Learning how to organize paperwork transforms chaotic kitchen-counter piles into a searchable, compliant archive in one afternoon. By executing a seven-step workflow-gathering all loose pages, stripping envelopes, triaging via the RSVP method, building a four-tier category hierarchy, assembling color-coded hanging files, loading documents chronologically, and locking in a 15-minute weekly routine-any beginner can clear a multi-year backlog in 3 to 5 hours. The single factor that most determines long-term success is eliminating “Miscellaneous” folders in favor of strict, action-based categorization.
Before You Start: Time, Cost, and Supplies
- Time Required: 3–5 hours for initial backlog purge; 15–30 minutes weekly for maintenance.
- Difficulty Level: Beginner (no prior filing experience required).
- Typical Cost: $15–$40 (Basic File Box Setup) to $100–$300 (Full Cabinet & Safe Setup).
- Prerequisite Conditions: A clear 4 ft × 4 ft flat staging surface (dining table or desk), access to your online banking/utility logins to verify digital availability, and uninterrupted focus for the initial triage phase.
Required Tools and Materials Checklist:
- 2 Desktop Letter Trays: Front-loading, stackable trays (8.5″ × 11″ Letter size) to serve as your “Inbox” and “Action” zones.
- 1 Primary Containment Unit: Either a portable plastic file box with built-in hanging rails (holds ~15 hanging folders) or a vertical/lateral steel filing cabinet.
- 1 Box of Hanging File Folders (25-count): Letter size (11.75″ wide between rail hooks) with 1/5-cut adjustable clear plastic tabs, in 4 colors (Red, Green, Blue, Yellow).
- 1 Box of Interior Manila File Folders (100-count): Letter size, 1/3-cut tabs, 11-point card stock thickness.
- 1 Thermal Label Maker: Brother P-touch or Dymo LetraTag with 12mm (0.47″) black-on-white laminated tape (handwritten Sharpie markers fade and smear over time).
- 1 Cross-Cut Paper Shredder: Minimum DIN P-4 security rating (shreds paper into confetti particles measuring 4mm × 35mm or smaller; 8-sheet minimum capacity).
- 1 UL-Rated Fireproof Document Safe or Pouch: UL Class 350 1-hour fire rating (withstands 1,700°F external heat while keeping internal temperature below 350°F), plus two 10-gram silica gel desiccant packets to prevent humidity damage.
- 1 Heavy-Duty Staple Remover: Claw or magnetic push-style for stripping packets before scanning or shredding.
Phase 1: Consolidation and Triage
Step 1: Gather All Loose Paperwork into One Zone
Collect every loose physical document from across your home, office, and vehicles into a single centralized staging area without reading or sorting a single page.
Walk room by room with a laundry basket or large cardboard box. Pull papers from kitchen counters, desk drawers, backpacks, briefcases, glove compartments, and mail slots. Stack the collected documents vertically beside your 4 ft × 4 ft workspace and place one empty desktop tray labeled INBOX right next to the stack. Keep your hands moving; the moment you pause to read an old utility bill or receipt, your momentum stalls.
- Success Checkpoint: You’ll know it worked when every horizontal surface, drawer, and vehicle compartment in your home is 100% free of loose paper, and a single consolidated stack sits beside your staging table.
- Common Mistake: Stopping to read, pay a bill, or make micro-piles while gathering. How to avoid it: Set a 20-minute countdown timer on your phone strictly for physical retrieval; ban yourself from reading text until the timer rings.
Step 2: Strip Envelopes, Staples, and Packaging Inserts
Remove all outer envelopes, plastic wrap, promotional inserts, paperclips, and non-legal staples from your gathered documents so only flat, scannable data sheets remain.
Work through your gathered stack in 2-inch batches. Rip open sealed envelopes, unfold tri-folded letters so they lie flat at 8.5″ × 11″, and immediately toss empty envelopes and glossy return-address envelopes into a recycling bin. Use your staple remover to unfasten multi-page statements, and discard blank “intentionally left blank” trailing pages or multi-language fee disclosures unless they contain a wet signature. Warning: Never remove staples from notarized legal originals, property deeds, or executed wills—unfastening a notarized packet invalidates the tamper-evident chain of custody in many jurisdictions.
- Success Checkpoint: You’ll know it worked when your raw paper stack shrinks in volume by 30% to 40% and consists entirely of flat, unfolded, single-layer sheets with zero envelopes.
- Common Mistake: Filing documents still folded inside their mailing envelopes. How to avoid it: Enforce a strict “no envelopes past the staging table” rule; envelopes hide the document date and cause hanging folders to bulge at the bottom.
Step 3: Triage Every Sheet Using the RSVP Method
Sort every individual document from the top of your stripped stack into one of four immediate fates: Recycle/Shred, Suspend (File), Verify (Action), or Pass On.
Place four containers on your table: a recycling bin, your DIN P-4 cross-cut shredder, your ACTION desktop tray, and an open space for your SUSPEND (Archive) pile. Pick up the top sheet, apply the 2-Minute Online Rule (“Can I retrieve this exact document online in under two minutes?”), and execute one action within 10 seconds:
- Recycle/Shred: Toss non-sensitive junk mail and catalogs into recycling. Feed anything containing your name, address, account numbers, or barcode directly into the cross-cut shredder.
- Suspend (File): Place tax records, active contracts, medical histories, and vital certificates face-up in your Archive pile for Step 4.
- Verify (Action): Place unpaid bills, forms requiring a signature, and event invitations into the high-visibility ACTION tray.
- Pass On: Place mail belonging to a spouse, roommate, or colleague directly into their designated hand-off zone.
Use the following retention matrix during triage to decide whether a document enters your Suspend pile or goes straight into the shredder:
| Retention Tier | Exact Timeframe | Specific Document Examples | Disposition Method |
| Immediate Purge | 0 Days | ATM receipts, reconciled credit card slips, pre-approved credit offers, store circulars. | DIN P-4 Cross-Cut Shredder |
| Short-Term | 1 Year | Paid utility bills, monthly bank/brokerage statements (once year-end summary arrives), expired insurance policies. | Shred after 12 months |
| Tax & Legal Audit | 7 Years | Federal/state tax returns (Form 1040), W-2s, 1099s, K-1s, HSA receipts, charitable donation acknowledgments, home improvement invoices. | Shred on January 1 of Year 8 |
| Active Asset Lifespan | Until Sold + 7 Years | Vehicle titles, active loan agreements, appliance warranties, brokerage purchase confirmations, property remodel permits. | Transfer to Tax Audit tier upon sale |
| Permanent Vital | Forever | Birth/death certificates, Social Security cards, passports, marriage/divorce decrees, DD-214 military discharge papers, property deeds, wills. | Never destroy (store in UL Fireproof Safe) |
- Success Checkpoint: You’ll know it worked when your raw backlog stack is completely gone, your shredder bin is full, your ACTION tray holds fewer than 15 urgent sheets, and only verified retention documents remain in your SUSPEND pile.
- Common Mistake: Falling into “Retention Paralysis”—keeping routine utility bills or bank statements “just in case.” How to avoid it: Trust the 2-Minute Online Rule; banks and utilities legally archive PDF statements for 7 years on their portals, making paper copies redundant clutter.
Phase 2: Architecture and Hardware Assembly
Step 4: Divide Your Archive into Four Macro-Categories
Separate your remaining Suspend pile into four distinct stacks corresponding to the core storage tiers: Vital, Financial, Operational, and Reference.
Clear your table and lay down four sticky notes as column headers. Sort your Suspend pile into these exact buckets:
- Vital (Red — Life & Legal Originals): Birth certificates, Social Security cards, passports, marriage licenses, divorce decrees, property deeds, vehicle titles, and original signed estate wills.
- Financial (Green — Money & Taxes): Active bank account agreements, investment statements, open loan contracts, and 7-year tax return packets (grouped by tax year).
- Operational (Blue — Active Household & Medical): Current insurance policies (auto, home, life, umbrella), medical history logs, lab results, Immunization records, and active home service contracts.
- Reference (Yellow — Manuals & Warranties): Receipts stapled to active warranty cards for appliances, electronics manuals (only if not downloadable as a PDF), and professional licenses.
- Success Checkpoint: You’ll know it worked when every sheet in your Suspend pile sits cleanly inside one of the four macro-stacks with zero leftover “orphan” papers.
- Common Mistake: Creating a fifth stack for “Miscellaneous” or “General” items that feel hard to classify. How to avoid it: Ban the word “Miscellaneous” completely; if a document does not protect your life/assets (Vital), track money/taxes (Financial), run your household/health (Operational), or prove a warranty (Reference), shred it immediately.
Step 5: Assemble Color-Coded Hanging and Interior Folders
Install color-coded hanging folders onto your file box or cabinet rails for broad categories, then insert labeled interior manila folders inside them for individual accounts.
Most beginners fail here by dumping loose papers directly into hanging folders or putting hanging tabs in random slots. Follow this mechanical assembly order:
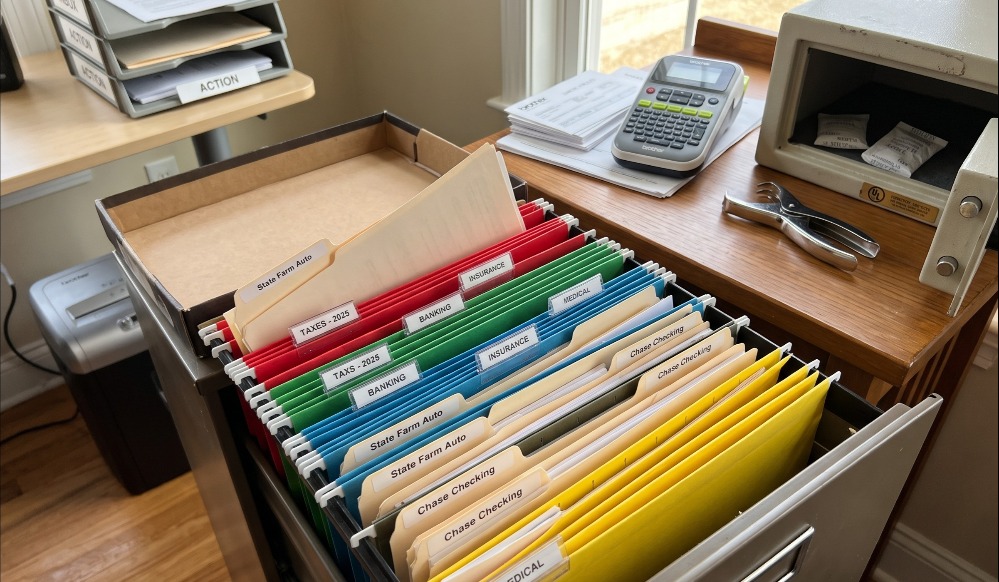
- Mount the Hanging Folders: Place your hanging folders onto the metal glide rails of your file box or cabinet drawer in color blocks from front to back: Green (Financial) at the front, Blue (Operational) in the middle, and Yellow (Reference) at the back. (Note: Red Vital files will go into your fireproof safe in Step 6,though you can keep one Red hanging folder for photocopies of vital records).
- Stagger the Plastic Tabs: Insert the clear plastic 1/5-cut tabs into the slots along the top edge of the hanging folders in a cascading left-to-right staircase pattern (Folder 1 in Slot 1 far left, Folder 2 in Slot 2, Folder 3 in Slot 3) so no tab blocks the one behind it.
- Print Macro-Labels: Use your 12mm thermal label maker to print uppercase macro-category labels (
TAXES - 2026,TAXES - 2025,BANKING,INSURANCE,MEDICAL,HOME & AUTO,WARRANTIES) and slide them into the plastic tabs. - Insert Interior Manila Folders: Never clip plastic tabs onto manila folders. Instead, print specific micro-labels (
Chase Checking - 4821,State Farm Auto,Honda Civic Maintenance,Pediatrician - Maya) and adhere them directly to the 1/3-cut top flaps of your manila folders. Slip 2 to 4 manila folders inside each corresponding hanging folder so the manila flaps sit 0.25 inches below the hanging plastic tabs.
- Success Checkpoint: You’ll know it worked when you can look down at your open file drawer at a 45-degree angle and read every single hanging tab and interior manila label simultaneously without using your fingers to push folders apart.
- Common Mistake: Overstuffing a single folder until the bottom creases and the hanging rails bend. How to avoid it: Enforce a strict 1-inch maximum thickness rule (~150 sheets) per hanging folder; if a folder hits 1 inch, score the pre-creased expansion lines along the bottom fold of the manila folder to give it a flat 0.75-inch box bottom, or split the folder chronologically (e.g.,
Medical - 2025andMedical - 2026).
Phase 3: Loading and Routine Maintenance
Step 6: Load Documents in Reverse Chronological Order and Lock Up Vital Originals
Insert your sorted papers upright into their matching interior manila folders with the newest date at the very front, and seal your Vital originals inside a fireproof safe.
Take each stack from Step 4 and load the papers into their matching manila folders with the top of the page facing up and toward you. Always place incoming documents at the front of the folder (reverse chronological order) so that when you open any folder, the most recent policy, bill, or tax return is the very first sheet you see. Next, place your Vital (Red) originals inside protective acid-free sleeves or a Red hanging folder, toss two 10-gram silica gel packets inside your UL Class 350 fireproof safe to absorb trapped moisture, and lock the safe. Leave at least 2 to 3 inches of slack at the back of every filing drawer so folders tilt freely in a “V” shape when opened.
- Success Checkpoint: You’ll know it worked when you can retrieve any specific document (e.g., your most recent auto insurance declaration page) in under 15 seconds using only one hand, and your vital legal certificates are locked inside a fire-rated container.
- Common Mistake: Packing the filing drawer or box so tightly that you need two hands—one to pry the folders apart and one to jam the paper down—to file a single sheet. How to avoid it: Never fill a drawer past 80% capacity; if insertion requires two hands, purge expired 1-year documents or add a second file box.
Step 7: Execute the Daily, Weekly, and Annual Maintenance Cadence
Maintain your archive at zero backlog by following a rigid three-part calendar schedule: a 30-second daily drop, a 15-minute weekly Inbox zero-out, and a 2-hour annual tax-season purge.
A filing system only fails when incoming paper bypasses the workflow. Lock these three recurring habits into your digital calendar:
- Daily (30 Seconds — The Entry Rule): Open incoming mail directly over your recycling bin and shredder. Strip envelopes immediately, shred junk, and drop surviving sheets into your INBOX tray. Never set mail on a kitchen counter or dining table.
- Weekly (15–30 Minutes — Sunday Triage): Empty the INBOX and ACTION trays to zero. Pay pending bills, log tax-deductible receipts, and file Suspend sheets into the front of their respective manila folders.
- Annually (2–3 Hours — Tax Preparation Weekend): Every February or March, as you file the new year’s tax return (e.g.,
Taxes - 2026), pull out the tax folder from 8 years prior (e.g.,Taxes - 2018) and feed the entire folder contents into your shredder. Simultaneously empty all 1-year utility and monthly statement folders from the previous calendar year and shred them. - Success Checkpoint: You’ll know it worked when your INBOX tray hits empty every Sunday evening and your total folder count remains completely static year over year because every new tax folder created replaces one old tax folder shredded.
- Common Mistake: Letting the INBOX tray overflow for a month until it becomes an intimidating secondary backlog. How to avoid it: Position your file box and shredder within arm’s reach (less than 3 feet) of where you open your mail so filing takes less effort than stacking.
Common Mistakes and How to Fix Them
Even well-built systems break down under daily stress. Here is how to diagnose and recover from the five most common failure modes:
- The “Miscellaneous” Dumping Ground: A folder labeled
Misc.orGeneralinevitably swallows 30% of your documents because it requires zero cognitive effort during filing, making retrieval impossible.- Recovery Fix: Pull the
Misc.folder out immediately. Lay every sheet out on your table. If 3 or more sheets share a theme, print a dedicated micro-label and create a new manila folder. If a sheet is a one-off, either assign it to the closest existing macro-category or shred it if it fails the 2-Minute Online Rule.
- Recovery Fix: Pull the
- The Desktop Avalanche (Friction Overload): Piles re-form on your desk because your filing cabinet is hidden inside a hallway closet or behind a heavy door, making the physical act of filing annoying.
- Recovery Fix: Lower the mechanical friction. Move a portable hanging file box or vertical desktop step sorter directly onto or beside your desk within a 36-inch arm’s reach. If opening a drawer takes more than 2 seconds, relocate the container.
- Bowing and Slumping Hanging Folders: Hanging folders sag off their rails, catch on the drawer ceiling, and bury their plastic tabs below the folder line.
- Recovery Fix: Inspect the bottom crease of every interior manila folder. Once a folder exceeds 50 sheets (0.35 inches), fold the pre-scored ridges along the bottom spine to create a flat rectangular base. If a hanging folder exceeds 1 inch total thickness, split it into two hanging folders by date or alphabet (e.g.,
Medical A–MandMedical N–Z).
- Recovery Fix: Inspect the bottom crease of every interior manila folder. Once a folder exceeds 50 sheets (0.35 inches), fold the pre-scored ridges along the bottom spine to create a flat rectangular base. If a hanging folder exceeds 1 inch total thickness, split it into two hanging folders by date or alphabet (e.g.,
- Thermal Paper Receipt Fading: Cash register receipts for expensive electronics, HSA medical co-pays, or tax deductions turn completely blank white after 12 to 18 months due to heat-sensitive BPA/BPS coating oxidation.
- Recovery Fix: Never file raw thermal receipts alone for multi-year retention. Either scan the receipt immediately to PDF or photocopy it onto standard 20-lb bond printer paper, then staple the fading thermal original to the top corner of the photocopy before filing.
- Mildewed or Brittle Vital Records in Safes: Airtight fireproof safes trap ambient humidity in their insulation lining, causing birth certificates and deeds to grow mold or stick together within 6 months.
- Recovery Fix: Open your fireproof safe once a month for 10 minutes to air it out, store documents inside archival-grade polypropylene (acid-free, PVC-free) sheet protectors, and replace your 10-gram color-indicating silica gel desiccant packets every 6 months.
System Variations for Different Spaces and Profiles
Not every household or office needs a steel cabinet. Adjust Step 5 and Step 6 based on your spatial constraints, volume, and digital comfort level:
Storage Hardware Comparison
| Storage Type | Primary Pro | Primary Con | Capacity Ceiling | Best Used For |
| Filing Cabinet (Vertical/Lateral) | Massive capacity, lockable steel security | Large floor footprint (3–6 sq ft) | 3,000–12,000 sheets | Home estates, business archives |
| Portable File Box | High portability, fits on closet shelves | Limited volume ceiling | 800–1,200 sheets | Renters, apartments, basic household tracking |
| Accordion Folder | Ultra-compact, self-contained slots | Vulnerable to tearing and slumping | 200–350 sheets | Single-year tax collection, active travel docs |
| Three-Ring Binder | Highly scannable like a book | High assembly effort (hole punching/sleeves) | 250–500 sheets | Active medical histories, appliance manuals |
| Fireproof Safe (UL Class 350) | Maximum heat (1,700°F) and theft protection | Extremely heavy (30–80 lbs), low capacity | 100–300 sheets | Passports, deeds, certificates, original wills |
1. The Digital Minimalist (“Scan and Shred” Hybrid Workflow)
- Who It’s For: Apartment dwellers, digital nomads, or users who want zero filing cabinets.
- Toolkit Change: Replace the filing cabinet with a duplex sheet-fed document scanner (e.g., Fujitsu ScanSnap iX1600, 40 pages/minute), a DIN P-4 shredder, and a tiny UL-rated fireproof document box.
- Process Adjustment: During Step 3 (Triage), scan 95% of your Suspend pile at 300 DPI in searchable PDF (OCR) format. Name every digital file using strict ISO 8601 syntax:
YYYY-MM-DD_Category_Vendor_Description.pdf(e.g.,2026-04-15_Tax_IRS_Form1040.pdf). Back up the folder across the 3-2-1 Backup Rule (1 primary computer drive, 1 encrypted external SSD, 1 zero-knowledge cloud drive like Proton Drive or iCloud Advanced Data Protection). Shred the paper originals immediately. Retain only physical Vital (Red) legal originals with raised seals or wet signatures inside your fireproof box.
2. The Visual / ADHD-Friendly Professional (“Out of Sight = Out of Mind”)
- Who It’s For: Visual thinkers who forget to pay bills or reference documents the moment they close a solid drawer.
- Toolkit Change: Replace enclosed filing boxes with open-top desktop vertical step sorters (tiered wire or acrylic slots) and color-coded 1.5-inch D-ring binders with clear polypropylene top-loading sheet protectors.
- Process Adjustment: Eliminate interior manila folders inside hidden drawers. Keep all active Verify (Action) and current-year Operational sheets standing upright in tiered desktop slots directly in your line of sight. Store reference manuals and medical histories inside color-coded binders on an open bookshelf where the spine labels remain visible 24/7.
3. The High-Volume Home Estate or Small Business
- Who It’s For: Homeowners with multiple properties, rental units, complex trusts, or small business LLC records.
- Toolkit Change: Deploy a heavy-gauge 4-drawer lateral steel filing cabinet (36″ wide), legal-size (8.5″ × 14″) box-bottom hanging folders with 1-inch expansion gussets, and a standalone floor-bolted UL fire safe.
- Process Adjustment: Assign an entire drawer to each macro-category: Drawer 1 for Household, Real Estate & Automotive Operations; Drawer 2 for Active Medical, Insurance & Financial Accounts; Drawer 3 for Business LLC / Rental Property Ledgers; and Drawer 4 for 7-Year Historical Tax Archives using strict alphanumeric indexing (
FIN-01,FIN-02).
How Long Does It Take and What Does It Cost?
| Setup Tier | Initial Backlog Time | Total Hardware Cost | Included Equipment |
| Entry-Level (Renter / Minimalist) | 2–3 Hours | $15 – $40 | 1 portable plastic file box ($12), 25-pack color hanging folders ($10), 50 manila folders ($6), handheld label maker or permanent marker ($10). |
| Standard Household (Recommended) | 3–5 Hours | $100 – $180 | 2 desktop trays ($15), 2-drawer metal file cabinet or 2 heavy file boxes ($55), hanging + manila folders ($20), Brother P-touch label maker ($30), 8-sheet DIN P-4 shredder ($45). |
| Comprehensive Estate / Hybrid | 6–8 Hours (Weekend) | $250 – $650 | 4-drawer lockable cabinet ($150), UL Class 350 fireproof safe ($80), heavy-duty cross-cut shredder ($90), high-speed duplex OCR scanner ($300). |
What moves you within these ranges: Your initial setup time scales by roughly 1 hour for every 12 inches of stacked raw backlog paper. If you choose to scan every historical document rather than physically filing it, add 45 minutes per foot of paper.
Frequently Asked Questions
Should I remove staples and paperclips before filing paperwork?
Remove all bulky paperclips, binder clips, and mailing envelopes before filing because they catch on adjacent folders and double stack thickness. Keep single top-left staples on multi-page tax returns or contracts so pages stay together, and never unfasten notarized legal documents, wills, or property deeds, as removing the original staple invalidates tamper-evident legal integrity.
Do I need to keep paper copies if I scan my documents to the cloud?
You can safely shred 95% of routine financial, medical, and tax documents after scanning them at 300 DPI, because the IRS (under Revenue Procedure 97-22) accepts legible digital scans for tax audits. However, you must keep physical originals of Vital documents featuring raised embossed seals, watermarks, or wet-ink notarizations—specifically birth certificates, marriage licenses, passports, vehicle titles, and original wills.
Should I organize my filing cabinet alphabetically or by category?
Always organize by macro-category first, then alphabetically within each category. Pure alphabetical filing splits related documents apart (putting Auto Insurance at the front under A and Vehicle Registration at the back under V). Grouping by color-coded categories (Financial, Operational, Reference) keeps functional records together, while alphabetical interior folders make account lookup instant.
How do I organize small receipts so they don’t fall out of folders?
Never drop loose, tiny register receipts directly into full-size manila folders where they slip out the open sides. Instead, slide small tax or warranty receipts into a zippered 10″ × 5″ clear vinyl coupon envelope labeled by tax year (2026 Tax Receipts), and drop that sealed vinyl pouch inside your Taxes - 2026 hanging folder.
What should I do with manuals for appliances I still own?
Throw away thick multilingual paper appliance manuals as soon as you verify that the PDF version is downloadable by searching the brand and model number online. Instead of filing the bulky booklet, take a single sheet of paper, staple your purchase receipt and warranty card to it, write the appliance serial number on the page, and file that single sheet under Warranties.
Learning how to organize paperwork is not about buying expensive aesthetics; it is about building a low-friction physical pipeline where incoming paper has an immediate home and outdated paper has a scheduled exit date. Once your four macro-categories are hanging on the rails and your weekly 15-minute triage habit is on the calendar, paper clutter disappears permanently.