Knowing how to clean an office monitor properly removes dust, skin oils, and sneeze droplets without stripping delicate anti-glare coatings or shorting internal circuit boards. This beginner-friendly process takes 8 minutes of active and passive time across 7 sequential steps: powering down, clearing enclosure vents, dry dusting, dampening a microfiber cloth, emulsifying grime, buffing dry, and verifying evaporation. Success depends on one critical rule: applying controlled moisture to the cloth, never directly onto the screen.
Before You Start: Specs, Tools & Prerequisites
- Active Wiping Time: 2–3 minutes
- Passive Cooling & Drying Time: 15–20 minutes (10–15 min pre-cool + 5 min post-dry)
- Difficulty Level: Beginner
- Typical Cost: $5–$30 (depending on existing supplies)
- Prerequisite Conditions: A well-lit room with an overhead or angled task light to reveal invisible oil films, and clean, washed hands free of lotion.
Phase 1: Preparation and Dry Decontamination
Preparing the hardware and removing abrasive dry particulates prevents wet wiping from turning loose dust into microscopic sandpaper.
Step 1: Power Down and Cool the Display Panel
Shut off the monitor via its physical power button, unplug the AC power cable from the wall or surge protector, and wait 10 to 15 minutes for the panel to cool to room temperature.
An active LCD, LED, or OLED backlight generates surface temperatures between 35°C and 42°C (95°F–108°F). If you apply moisture to a warm screen, the liquid flash-evaporates before you can buff it away, baking polymer or mineral streaks onto the polarizer. Unplugging the AC cord eliminates electrostatic charge across the screen surface, which otherwise holds dust particles tight against the panel via static attraction. Furthermore, a pitch-black screen provides the high visual contrast required to spot dried saliva droplets and skin grease.
- Success Checkpoint: You’ll know it worked when the center of the screen feels cool to the back of your knuckles (roughly 20°C–22°C / 68°F–72°F) and reflects a uniform black surface.
- Common Mistake: Leaving the monitor in sleep/standby mode instead of unplugging it. Standby mode keeps internal power rails live; if moisture seeps behind the bezel, live voltage causes immediate electrolytic corrosion.
Step 2: Blow Out the Enclosure Vents and Wipe the Bezel
Clear dust from the rear ventilation slots using short bursts of compressed air, then wipe the plastic outer casing and stand with a separate cloth before touching the screen.
Most guides put enclosure cleaning last, which blasts trapped dust out of the vents directly onto your freshly polished display. Hold the compressed air can strictly upright (within a 15-degree vertical angle) positioned 10 to 15 cm (4–6 inches) away from the top and rear cooling grates. Fire three to five 1-second bursts across the ports and vents. Next, take a standard utility microfiber cloth slightly dampened with water and wipe the monitor stand, rear shell, and the outer perimeter of the front plastic bezel, supporting the back of the monitor with your non-dominant hand.
- Success Checkpoint: You’ll know it worked when no gray dust bunnies remain visible inside the top exhaust slats and the outer plastic frame feels smooth.
- Common Mistake: Tilting or shaking the compressed air can during use. Tilting forces liquid difluoroethane propellant out of the nozzle at -40°C (-40°F), which can crack thin plastic bezels via thermal shock and leave a hazy, bitter chemical film on the edge of the screen.
Step 3: Execute a Unidirectional Dry Dusting Pass
Glide a clean, dry 300–400 GSM microfiber cloth lightly across the glass or matte film in overlapping horizontal strokes from top to bottom to lift loose mineral dust.
Fold your plush microfiber cloth in half twice to create a flat, padded square with 8 usable faces. Starting at the top-left corner, sweep the cloth horizontally to the top-right corner using no more than 50 grams of pressure—just enough contact to keep the fabric flat against the surface. Shift down by half the width of your folded cloth and repeat the left-to-right pass until you reach the bottom bezel. Microfiber utilizes split polyester and nylon filaments that form thousands of microscopic hooks, mechanically trapping silica dust particles rather than dragging them across the coating.
- Success Checkpoint: You’ll know it worked when viewing the black screen at a 45-degree angle under desk lighting shows zero sunlit dust motes or lint fibers sitting on the surface, leaving only flat oil smudges behind.
- Common Mistake: Scrubbing in tight circles during the dry pass or using paper towels, facial tissues, or a cotton t-shirt. Paper products contain rigid wood-pulp fibers that score permanent hairline scratches into soft anti-glare (AG) matte coatings.
Phase 2: Wet Emulsification and Buffing
Introducing a controlled, mineral-free solvent breaks the surface tension of skin sebum, fingerprint oils, and dried respiratory droplets without degrading optical surface treatments.
Step 4: Mist the Microfiber Cloth Corner
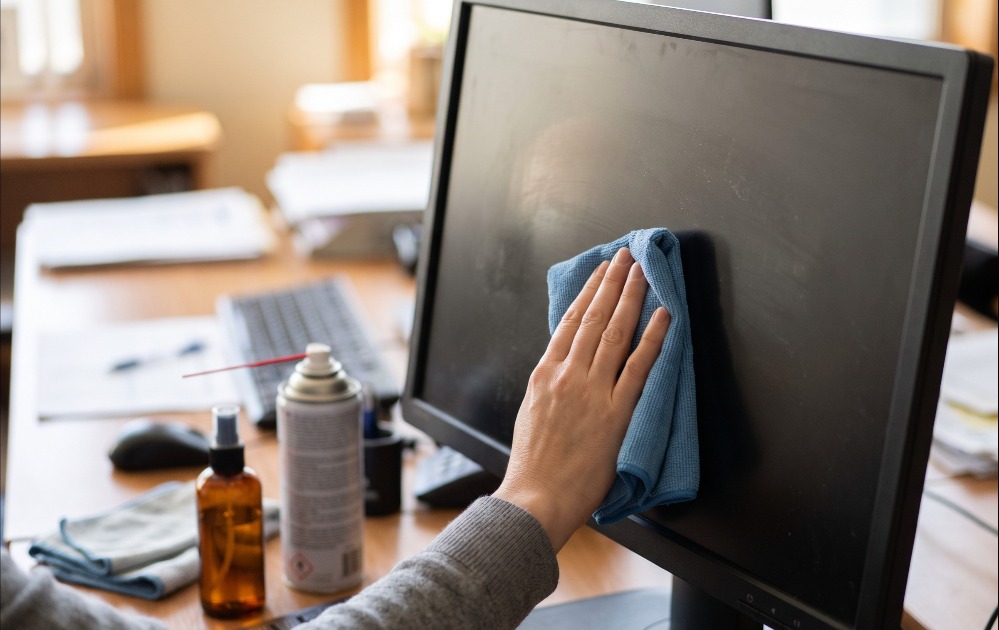
Apply 1 to 2 pump sprays (0.15 to 0.30 mL) of distilled water or an alcohol-free commercial screen cleaner onto one corner of your folded microfiber cloth from a distance of 15 cm (6 inches).
Warning — Hardware Failure Risk: Never spray any liquid directly onto the monitor screen. Gravity pulls misted droplets down the vertical panel in less than 2 seconds, wicking liquid into the 1 mm gap along the bottom bezel where the panel’s delicate Chip-on-Film (COF) ribbon cables and inverter boards sit.
Use pure distilled water for standard smudges. Unlike tap water, which contains calcium, magnesium, and chlorine that leave chalky white rings and cause microscopic friction, distilled water relies on pure surface tension to lift dirt. For heavy office grime, sneeze marks, or cosmetic grease, use a dedicated plant-based cleaner (like WHOOSH! Screen Shine) or a 50/50 mixture of distilled water and 5% distilled white vinegar.
- Success Checkpoint: You’ll know it worked when the sprayed cloth corner feels cool and lightly humid to your fingertips, but squeezing it between your thumb and forefinger produces zero liquid drips.
- Common Mistake: Oversaturating the cloth until it is soggy. If pressing the cloth against your palm leaves wet water beads on your skin, it is too wet and will pool along the monitor frame.
Step 5: Wipe the Panel Using Controlled Linear Strokes
Wipe the screen with the dampened cloth section in slow, overlapping horizontal or vertical strokes using 100 to 150 grams of pressure, stopping 3 to 5 mm short of the bezel edges.
Hold the rear top edge of the monitor frame with your free hand to keep the stand from wobbling. Draw the damp microfiber pad across the panel at a steady pace of roughly 15 cm (6 inches) per second. To gauge 100–150 grams of force, press your index finger on a kitchen scale or press just hard enough that the tip of your fingernail barely begins to turn white—anything heavier risks flexing the thin glass substrate. If a dried coffee drop or spit mark resists the first pass, hold the damp cloth gently over the spot for 5 seconds to let the distilled water rehydrate and emulsify the residue before wiping again, rather than pressing harder.
- Success Checkpoint: You’ll know it worked when all shiny fingerprint oils and raised crust marks dissolve into a faint, uniform, fast-fading moisture trail.
- Common Mistake: Pressing hard with a single fingertip behind the cloth to dig at a stubborn spot. Point-load pressure crushes the internal liquid crystal spacers, causing permanent dark “pressure bruises” or stuck sub-pixels.
Step 6: Buff Dry Immediately with a Fresh Cloth Section
Flip the microfiber cloth to a completely dry quadrant (or switch to a flat-weave 200–250 GSM polishing cloth) and buff the screen in wide, gentle strokes before the moisture air-dries.
You have a 15-to-20-second window after the wet pass before thin moisture films begin evaporating unevenly in office air conditioning. Using light, sweeping horizontal passes followed by vertical passes, absorb all remaining dampness and lifted oil emulsion from the panel. Pay special attention to the outer perimeter, wiping parallel to the frame edges to pick up any moisture boundary left near the 3–5 mm bezel buffer zone.
- Success Checkpoint: You’ll know it worked when inspecting the black panel from three angles (dead center, 45 degrees left, and 45 degrees right) reveals a uniform, streak-free matte or glossy finish with zero rainbow haze.
- Common Mistake: Waiting a minute before buffing, or buffing with a cloth previously washed with liquid fabric softener or dryer sheets. Fabric softeners coat microfiber hooks in hydrophobic silicone waxes, smearing grease across the monitor in iridescent rainbow streaks.
Phase 3: Recommissioning
Ensuring complete moisture dissipation protects high-voltage internal backlight drivers before electrical current returns to the chassis.
Step 7: Verify Evaporation and Restore Power
Allow the monitor to sit unplugged in a ventilated room for 5 full minutes to guarantee total micro-moisture evaporation before reconnecting the AC power cable and turning the display on.
Even when the panel center looks bone-dry after buffing, trace humidity can linger along the micro-bezel seams or rear port housings. Waiting 5 minutes allows ambient airflow to clear any residual vapor. Reconnect the power cord, press the power button, and load a solid white browser window (or blank document) alongside a solid black background to audit your work under full backlight illumination.
- Success Checkpoint: You’ll know it worked when the monitor boots normally with crisp edge-to-edge uniformity and displays zero cloudy patches or dark spots against a 100% white background.
- Common Mistake: Plugging the monitor back in immediately after a heavy wet clean, which can arc moisture trapped near the bottom edge LED driver strip.
Cleaning Methods & Solvents Compared
Selecting the right cleaning agent depends on soil severity and your display’s outer optical layer.
| Cleaning Agent / Method | Ideal Use Case | Mixing Ratio / Spec | Pros | Cons |
| Dry Microfiber (300–400 GSM) | Weekly maintenance; loose airborne dust | 100% dry; unwashed with softeners | Zero risk of liquid ingress or chemical damage; fast; reusable. | Cannot cut skin sebum, sneeze marks, or ink smudges. |
| Pure Distilled Water | Monthly cleaning; light fingerprints on matte LCDs | 100% pure (0 ppm mineral solids) | Chemically safe for 100% of anti-glare coatings; costs under $2/gallon. | Lower degreasing power on heavy facial oils; requires immediate buffing. |
| Distilled Water + White Vinegar | Heavy office grime, coffee splatters, hard water spit marks | Max 50/50 dilution (50% water, 50% white vinegar) | Mild acetic acid breaks down stubborn grease and mineral films cleanly. | Pungent odor; unsafe for OLEDs and specialized anti-reflective glass. |
| Commercial Alcohol-Free Kits | Multi-monitor corporate setups; glossy & matte displays | Pre-mixed (e.g., WHOOSH!, ScreenDr, iKlear) | Leaves anti-static barrier that repels dust; zero ammonia or phosphates. | Ongoing cost ($7–$30 per kit); requires tracking separate spray bottles. |
| Pre-Moistened Anti-Static Wipes | Shared hot desks, POS touchscreens, shift rotations | Individually wrapped, alcohol-free low-moisture wipes | Fast sanitation across staff shifts; prevents liquid pooling near bezels. | Generates disposable waste; low-pile fiber can streak if wipe dries out. |
Process Variations by Display Type and Environment
Not every office monitor uses a standard matte plastic polarizer. Adjust your materials for these three common workplace hardware variations:
1. Glossy Glass Panels & Apple Nano-Texture Displays (Creative Pros)
- Standard Glossy Glass (Apple Studio Display, iMac): Laminated edge-to-edge glass tolerates mild chemical action better than bare matte film. Use a dedicated commercial spray (such as WHOOSH! Screen Shine or iKlear) paired with a tight-weave micro-chamois cloth to maintain deep black contrast and color calibration accuracy.
- Apple Nano-Texture Glass: Nano-texture glass has a nanometer-scale etched surface that scatters glare. Never use water, vinegar, or standard cleaners. Per Apple engineering specs, use only the dry proprietary Apple Polishing Cloth for daily dust, and dampen the cloth exclusively with a 70% isopropyl alcohol (IPA) solution for stubborn oil marks.
2. QD-OLED and WOLED Office Monitors (Executives & Designers)
- Why It Changes: Quantum Dot OLED panels (such as Dell Alienware, Samsung Odyssey, or ASUS ProArt OLEDs) feature ultra-soft, high-contrast anti-reflective resin coatings that scratch easily and smear violently with tap water or vinegar.
- Modified Process: Never use white vinegar or commercial polymers that leave anti-static films. Use two brand-new, high-pile optical microfiber cloths. Mist the first cloth with pure distilled water (or a manufacturer-approved 70% ethanol/IPA mix only for greasy smudges, per Samsung Display guidelines), wipe with feather-light pressure (under 50 grams), and buff immediately with the second dry cloth before the fluid evaporates.
3. Shared Hot Desks & Touchscreens (IT Admins & Facility Managers)
- Why It Changes: High-touch hoteling monitors accumulate heavy hand lotion, cosmetics, and pathogens across daily staff shifts, and handing spray bottles to rotating employees invites liquid-ingress damage.
- Modified Process: Deploy bulk dispensers of individually wrapped, alcohol-free, anti-static pre-moistened electronic wipes. Enforce a 60-second wipe-down protocol at shift changeover: wipe the touchscreen in a Z-pattern from top to bottom while the screen is dark, followed by a quick dry microfiber pass if moisture beads remain.
Common Mistakes and How to Fix Them
Even experienced users run into optical blemishes or hardware hiccups. Use these diagnostic recovery steps to fix the five most common failure modes:
1. Persistent Cloudy Streaks or Rainbow Smears
- Root Cause: The microfiber cloth was either oversaturated with fluid, contaminated with skin grease from prior uses, or washed with liquid fabric softener/dryer sheets.
- How to Fix It: Wash your microfiber cloths in hot water using a tiny drop of clear, dye-free detergent (no bleach, no fabric softener) and air-dry them. Once dry, re-wipe the cool screen using a barely humidified corner of distilled water, followed within 5 seconds by a vigorous buff with a fresh, dry cloth.
2. Monitor Fails to Turn On (or Flickers) After Cleaning
- Root Cause: Liquid ran down the panel face and wicked behind the bottom bezel, contacting the low-voltage differential signaling (LVDS) ribbon cable or T-Con board.
- How to Fix It: Immediately yank the AC power cord from the wall—do not try cycling the power button. Unplug all HDMI/DisplayPort cables, lay a thick bath towel flat on a desk in a warm, dry, well-ventilated room, and place the monitor face-down on the towel for 24 to 48 hours. Facing the panel downward prevents gravity from pulling moisture deeper into the electronics assembly while it evaporates.
3. Immovable Dark Blotches or Sharp Pinpoints
- Root Cause: You are scrubbing a physical hardware defect rather than surface dirt.
- How to Fix It: Stop rubbing immediately and inspect the spot under a magnifying glass with the monitor powered on against a white background. If you see a tiny, razor-sharp geometric square (black, red, green, or blue), it is a dead or stuck pixel. If you see a soft-edged, cloudy gray or purple shadow that doesn’t shift when wiped, it is a pressure bruise caused by excessive wiping force crushing the liquid crystal layer. Neither can be cleaned away; pressure bruises are permanent.
4. Hazy, Peeling, or Blotchy Anti-Glare Coating (“Staingate”)
- Root Cause: Someone cleaned the screen with Windex, household glass cleaner (ammonia), nail polish remover (acetone), or high-concentration rubbing alcohol, chemically dissolving the microscopic matte anti-reflective film.
- How to Fix It: Chemical delamination cannot be reversed by cleaning. Halt all solvent use and clean only with pure distilled water to prevent the peeled border from expanding. If the monitor is under warranty, check for OEM coating replacement programs; otherwise, an external matte screen protector film can mask the optical blotching.
5. Fine Hairline Scratches Appearing After Wiping
- Root Cause: Skipping Step 3 (the dry dusting pass) or using paper towels, Kleenex, napkins, or a rough shirt collar, which dragged hard quartz dust particles across the soft polarizer film.
- How to Fix It: Do not attempt to use abrasive toothpaste, baking soda, or automotive plastic polishes—these strip the surrounding anti-glare coating and turn a 1 mm scratch into a 5 cm glossy crater. Clean the scratch gently with distilled water so trapped dirt doesn’t accentuate the line, and reduce direct side-glare lighting on your desk to make the micro-abrasion invisible during daily work.
Frequently Asked Questions
How often should you clean an office monitor?
Dust your office monitor lightly once a week using a dry microfiber cloth to prevent static buildup. Perform a deeper damp clean with distilled water every 1 to 2 months for a private desk, or weekly (and between staff shift changes) for shared hot desks and touchscreens.
Can I use 70% isopropyl alcohol or Clorox wipes on my monitor?
Never use Clorox wipes, household disinfecting wipes, or high-strength alcohol on standard matte office monitors, as harsh solvents strip anti-glare coatings and cause clouding. Only use a maximum 50% diluted isopropyl alcohol mix (or 70% IPA where explicitly instructed by the OEM) on bare glass or specific OLED panels.
Why does my monitor look worse and streakier after wiping it with water?
Streaking happens when you use tap water instead of distilled water, wipe a hot screen, or use a dirty microfiber cloth. Tap water leaves dissolved calcium and magnesium trails behind as it dries, while warm panels evaporate water before your dry cloth can lift the emulsified skin oils off the glass.
How much does it cost to set up an office monitor cleaning kit?
A complete, reusable monitor cleaning setup costs between $5 and $30 and lasts 1 to 2 years. Multi-packs of optical microfiber cloths (such as E-Cloth) cost $5 to $12, basic spray kits (like the onn. 18-Piece Screen Kit) run $7 to $15, and premium specialty kits (like iKlear) cost $15 to $30.
Can I use eyeglass cleaner spray on my computer monitor?
Check the ingredient label before applying eyeglass spray to an office monitor. Many prescription lens sprays contain isopropyl alcohol or surfactants formulated for hard polycarbonate glasses that will degrade soft monitor polarizers. Only use eyeglass fluid if the bottle explicitly states it is 100% alcohol-free and ammonia-free.
Mastering how to clean an office monitor comes down to respecting the optical coatings: let the panel cool for 10 to 15 minutes, dust the vents and screen dry first, apply 1 to 2 sprays of distilled water strictly to your microfiber cloth, and buff dry with under 150 grams of pressure. Keep a dedicated 300 GSM microfiber cloth in your desk drawer for weekly 30-second dry passes, and your display will stay crisp and streak-free for the life of the hardware.