Knowing how to clean an office keyboard restores crisp typing tactility, eliminates sticky switches, and removes microbial buildup without shorting internal circuits. The process follows eight sequential steps across two phases—electrical isolation, dry debris extraction, surface disinfection, and deep keycap washing—taking 10 minutes for surface upkeep or 90 minutes for a deep overhaul. Success depends on matching your cleaning depth to your switch architecture so you never trap moisture inside electronic contacts.
Before You Start: Prerequisites, Tools, and Costs
- Time Required: 5–10 minutes (Phase 1: Surface Maintenance); 1–2 hours active work + 6–12 hours drying time (Phase 2: Deep Clean).
- Difficulty Level: Beginner (Phase 1) to Intermediate (Phase 2).
- Typical Cost: $14–$35 total (free if using household dish soap and rubbing alcohol).
- Prerequisite Conditions: You must identify your keyboard’s switch mechanism before attempting Phase 2. Pry up the edge of your
Esckeycap by 2mm and look underneath with a phone flashlight:- Mechanical Switch: You see a rigid plastic housing with a central cross-shaped (
+) or box-shaped stem. Safe for Phase 1 and Phase 2. - Membrane / Rubber Dome: You see a hollow plastic plunger sliding into a plastic barrel over a silicone sheet. Safe for Phase 1; proceed to Phase 2 only if your manual confirms removable keycaps.
- Scissor Switch (Laptops & Ultra-Slim Office Boards like Logitech MX Keys or Apple Magic Keyboard): You see flat, low-profile keys (under 3mm travel) sitting on X-shaped white plastic hinges. STOP after Step 4. Pulling these keycaps snaps the microscopic retention pins.
- Mechanical Switch: You see a rigid plastic housing with a central cross-shaped (
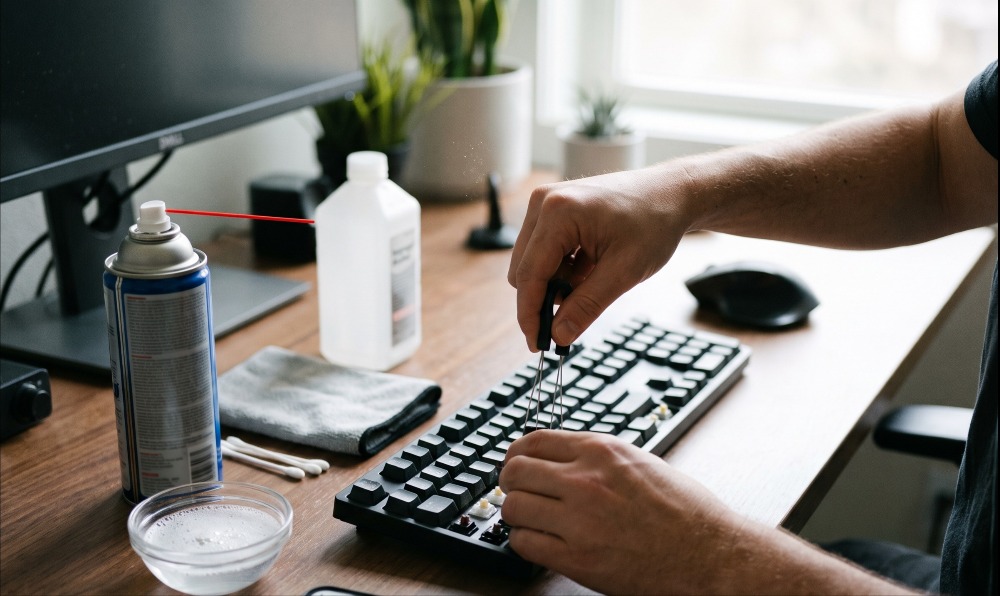
Required Tools and Materials Checklist:
- 70% Isopropyl Alcohol (IPA): 50ml ($3–$8 per bottle) for exterior plastics and pathogen sanitization.
- 91%–99% Isopropyl Alcohol (Optional): 15ml ($4–$9 per bottle) for sticky mechanical switches or internal circuit cleaning.
- Compressed Air Can (Difluoroethane) or Electric Air Duster: 1 standard 10 oz can ($6–$15).
- Wire Keycap Puller: 1 dual-wire loop tool (included in $5–$15 7-in-1 or 10-in-1 electronics cleaning kits; avoid cheap claw-style plastic pullers as they scratch keycap sides).
- Soft High-Density Nylon Brush & Soft-Bristle Toothbrush: 1 of each.
- Lint-Free Microfiber Cloths: 2 cloths (300 GSM weave or tighter).
- Pointed Cotton Swabs: 10–15 tightly wound swabs.
- Mild Dish Soap (Phosphate-Free, Non-Abrasive): 3–5ml (approx. 3–4 drops, such as Dawn Ultra).
- Mixing Bowl & Dry Terrycloth Towel: 1 two-quart bowl and 1 standard towel.
Phase 1: Quick Maintenance Clean (All Keyboard Types)
Step 1: Isolate Power and Drain Board Capacitance
Disconnect the keyboard from all power sources and discharge residual electricity before introducing any cleaning tools or solvents. Shut down your computer or lock your screen, unplug the USB-A or USB-C cable from the workstation or Thunderbolt dock, or slide the wireless power toggle to the OFF position and remove AA/AAA batteries. Once disconnected, press and hold the Spacebar and Esc keys simultaneously for 5 full seconds to drain residual charge stored in the printed circuit board (PCB) capacitors.
- You’ll know it worked when: Caps Lock, Num Lock, and RGB status LEDs remain completely dark when tapped, and pressing keys produces zero input on your monitor.
- Common Mistake: Using a software “keyboard locker” app instead of physical disconnection. Even with inputs blocked in software, the USB 5V rail remains live—meaning a single drop of liquid or conductive propellant can short-circuit the microcontroller.
Step 2: Invert and Tap Out Loose Macro-Debris
Turn the keyboard upside down over a trash bin and use controlled tapping to dislodge crumbs, staples, and hair via gravity. Hold the chassis firmly by its left and right bezels at a 180-degree inverted angle (keys facing straight toward the floor) about 15cm (6 inches) above a wide trash receptacle. Tap the center and four corners of the rear plastic backplate firmly with the heel of your palm 8 to 10 times, then tilt the board 30 degrees left and right while shaking side-to-side for 15 seconds.
- You’ll know it worked when: Tapping the backplate over a clean sheet of white paper yields no further falling crumbs or dust flakes.
- Common Mistake: Banging the edge of the keyboard against the rim of the trash bin or desk. Impact shocks crack internal solder joints on USB ports and snap the plastic alignment pegs holding membrane sheets in place.
Step 3: Brush Channels and Blast with Compressed Air
Sweep a high-density brush through the key rows and flush out trapped micro-particles using angled bursts of compressed air. First, hold the keyboard tilted at a 75-degree angle against your desk and sweep a dry, soft nylon brush left-to-right down every horizontal row to break static bonds holding dust to the switch plate. Next, attach the red precision straw to your compressed air can. Holding the can strictly upright (90 degrees vertical) and angling the keyboard so the nozzle points into the gaps at a 45-degree angle, fire 1-second bursts in a top-to-bottom zigzag pattern from 3cm (1.2 inches) away.
- You’ll know it worked when: Shining a flashlight across the horizontal corridors between key rows reveals a clean bottom plate with no bridged lint or dust bunnies.
- Common Mistake: Tilting or shaking the compressed air can during spraying. Tilting causes liquid difluoroethane propellant to spit out at -50°C (-58°F), which thermally shocks ABS plastic into turning permanently chalky white and condenses moisture inside switches.
Step 4: Sanitize Keycaps and Frame with 70% Alcohol
Wipe the exterior keycap tops, side walls, and outer chassis using a microfiber cloth dampened with 70% isopropyl alcohol to dissolve skin oils and sanitize pathogens. Pour 5ml (one teaspoon) of 70% IPA directly onto a folded corner of your lint-free microfiber cloth—never onto the keyboard itself. Squeeze the cloth to ensure it is barely damp and cannot drip when pinched. Scrub each keycap top using circular motions with medium finger pressure, then wrap the cloth over your index fingernail to trace down the vertical gutters between columns. Leave the surface visibly slightly damp for 30 seconds before buffing dry with the clean side of the cloth.
- You’ll know it worked when: The greasy, reflective “shine” from finger oils disappears, leaving the plastic with a uniform matte texture that feels dry and squeaky to the touch within 45 seconds.
- Common Mistake: Using 99% IPA for surface disinfection or spraying household glass cleaner (Windex). Pure 99% alcohol evaporates in under 5 seconds—before it can penetrate and lyse bacterial cell walls—while ammonia-based glass cleaners strip UV-protective coatings and dissolve pad-printed key legends.
Phase 2: Comprehensive Deep Clean (Removable Keycaps Only)
Step 5: Document Key Layout and Extract Keycaps
Photograph your exact key layout and pull every removable keycap straight upward using a wire keycap puller. Take a well-lit, top-down photo of your entire keyboard with your smartphone so you have a map for non-standard office keys (PrtScn, SysRq, Pause, and bottom-row modifier widths). Slide the two metal loops of your wire keycap puller down opposite sides of a standard 1u keycap until you feel a faint click beneath the bottom rim, twist the puller 45 degrees so the wires hook under opposite diagonal corners, and pull straight up at a 90-degree vertical angle to the board.
For large stabilized keys (Spacebar, Enter, Left/Right Shift, Backspace), check the stabilizer style as you lift the cap 3mm:
- Cherry-Style (Three
+stems): Pull straight up gently from both ends simultaneously. - Costar-Style (Exposed metal wire bar clipped into white plastic inserts inside the keycap): Lift one side of the keycap 4mm, slide the keycap horizontally 2mm to unhook the wire from the left loop, then slide the opposite way to free the right loop.
- You’ll know it worked when: All keycaps sit detached in your bowl with intact inner cross-stems, and every switch housing remains firmly seated in the keyboard plate with zero bent wire bars.
- Common Mistake: Wiggling or prying keycaps sideways at an angle with a screwdriver or butter knife. Lateral torque snaps the thin internal cross-stem of the switch, turning a $0 cleaning job into a soldering repair.
Step 6: Soak, Scrub, and Dry the Detached Keycaps
Wash the detached keycaps in warm soapy water for 30 minutes, scrub off caked biological grime, and air-dry them completely for 6 to 12 hours. Fill a two-quart bowl with lukewarm water measured between 38°C and 43°C (100°F–110°F—comfortable bath temperature, never hot tap water) and stir in 3–4 drops (4ml) of mild dish soap. Submerge the keycaps, agitate them by hand for 60 seconds, and let them soak for 20 to 30 minutes to soften dried skin oils and food sugars. Use a soft-bristle toothbrush to scrub the textured tops and four side skirts of each cap, rinse thoroughly in a colander under cool running tap water, and vigorously flick each keycap downward 3 times to eject water trapped inside the hollow mounting stem before laying them stem-down on a dry towel for 6 to 12 hours.
- You’ll know it worked when: Tapping the hollow underside of your largest keycap (
Spacebar) firmly against a dry square of toilet paper produces zero damp marks, and inspecting the inner cross-stem under a light shows no trapped water meniscus. - Common Mistake: Using boiling water, a dishwasher, or a hairdryer on high heat. Acrylonitrile Butadiene Styrene (ABS) plastic softens above 55°C (131°F), causing long keys like the Spacebar to warp into a banana curve that binds permanently when pressed.
Step 7: Detail the Bare Switch Plate with Alcohol Swabs
Vacuum away loose debris on the exposed mounting plate and scrub the narrow channels between switches using cotton swabs moistened with isopropyl alcohol. Run a mini brush-tipped vacuum or compressed air across the bare switch matrix to clear hair wrapped around switch bases. Dip a pointed cotton swab into 70% IPA (or 91%–99% IPA if cleaning right next to exposed mechanical switch sliders) and dab it on a paper towel so it is moist, not dripping. Run the swab along the 3mm-wide valleys between the switch housings, applying firm pressure to lift brown rings of dried coffee, skin dander, and adhesive residue. Use a dry swab end immediately afterward to lift the dissolved grime before the alcohol evaporates.
- You’ll know it worked when: The metal or plastic mounting plate between switches shows its original factory finish with no sticky tackiness or dark debris halos around the base of the switch housings.
- Common Mistake: Using fluffy, loosely wound cosmetic cotton balls on an exposed plate. Loose cotton fibers snag on the sharp metal leaf springs, LED diodes, and stabilizer clips, pulling them out of alignment.
Step 8: Reinstall Keycaps and Verify Key Actuation
Press each completely dry keycap vertically onto its matching switch stem according to your reference photo and test every switch for proper actuation. Start by reinstalling the large stabilized keys (Spacebar, Enter, Shifts): if using Costar wire stabilizers, hook the metal bar into both white keycap inserts before pressing the center stem onto the switch; if using Cherry stabilizers, align the three stems and push down evenly with two fingers. Install the remaining keys row by row from top (F1–F12) to bottom, pressing each cap straight down with about 1.5 kg (3.3 lbs) of force until it bottoms out solidly against the stem shoulder. Reconnect the keyboard and open a browser-based key tester (such as KeyboardTester.com or QMK Configurator).
- You’ll know it worked when: Every key sits at an even height along its row profile, rebounds instantly without grinding or sticking, and registers a single clean keystroke on screen when pressed once.
- Common Mistake: Installing the
FandJhoming keys in the wrong orientation or mixing up row profiles (R1 through R4). Standard OEM and Cherry keycaps are sculpted at different angles per row—putting aZ-row key on theQ-row leaves it sticking up 2mm higher than its neighbors.
Common Mistakes and How to Fix Them
- Non-Responsive Keys or Garbled Output After Cleaning
- The Cause: Liquid cleaner or residual rinse water wicked down a switch stem and bridged two contact traces on the PCB or membrane layers.
- How to Fix It: Immediately unplug the keyboard (leaving it powered causes electrolytic corrosion within minutes). Pull the keycaps around the affected area, invert the keyboard at a 45-degree tented angle over a dry towel in a warm, well-ventilated room, and leave it completely unpowered for 48 full hours before retesting.
- Sticky, Sluggish, or Non-Returning Switch Stems
- The Cause: Dried sugary beverages (soda, sweetened coffee) or un-rinsed dish soap residue inside the switch housing is binding the slider rail.
- How to Fix It: Unplug the board and remove the keycap. Depress the sticky switch stem fully with a toothpick and apply 2 drops of 99% isopropyl alcohol (never 70% inside a switch) directly into the gap between the slider and housing. Rapidly tap the bare stem 50–60 times to dissolve the sugar, then wait 30 minutes for total evaporation before retesting.
- Rattling or Unresponsive Spacebar After Reassembly
- The Cause: The metal stabilizer wire popped out of its retention clip under the plate, or the Spacebar keycap was installed upside down.
- How to Fix It: Pull the Spacebar off and inspect the two side stabilizer housings. Use fine tweezers to snap the metal wire back into the tiny plastic notch on the bottom of each stabilizer housing, ensuring the wire moves both auxiliary stems up and down in unison when lifted.
- Sticky Film Left Behind by Cleaning Gel / Slime
- The Cause: Pressing cleaning gel (
ColorCoralor similar) onto a warm keyboard or leaving it sitting between keys for more than 3 seconds caused the borax-polymer compound to melt and tear inside the switch crevices. - How to Fix It: Let the keyboard cool to room temperature. Roll a fresh, cool ball of cleaning gel rapidly over the stuck residue using quick 1-second dabs—fresh gel sticks to old gel stronger than plastic. Clean any remaining shiny film using a pointed cotton swab moistened with 70% IPA.
- The Cause: Pressing cleaning gel (
- Cloudy White Marks on Black Keycaps
- The Cause: Accidentally using acetone (nail polish remover), harsh bleach wipes, or freezing difluoroethane liquid from a tilted air can chemically etched the ABS plastic surface.
- How to Fix It: Wipe the affected keycap clean with 70% IPA, then rub a micro-drop of food-grade mineral oil or silicone keycap restorer into the plastic with a microfiber cloth and buff dry for 60 seconds to restore optical darkness.
Variations for Different Keyboard Types and Office Environments
1. Laptop and Ultra-Slim Scissor-Switch Keyboards
Never use a keycap puller on a laptop, Apple Magic Keyboard, or Logitech MX Keys—their dual-interlocking plastic scissor hinges are less than 0.8mm thick and snap permanently when pried upward. Power off the laptop completely, open the lid to its wide angle, and hold the base tilted at a 75-degree angle. Fire short 0.5-second puffs of compressed air into the 1mm gap beneath each keycap while rotating the laptop across all four orientations. If a crumb is wedged underneath a key, slide the sticky edge of a folded Post-it note under the keycap skirt from left to right to hook the particle out, then finish with Step 4’s damp 70% IPA cloth wipe.
2. Standard Office Membrane & Rubber Dome Keyboards
Budget corporate keyboards (such as the Dell KB216 or HP 125) use a continuous three-layer flexible Mylar circuit sheet beneath a single silicone dome mat. If liquid gets past the key plungers, capillary action pulls the moisture between the Mylar sheets where it can take weeks to evaporate. Keep membrane keyboards strictly to Phase 1 (Steps 1–4). If a heavy spill forces you to deep-clean a membrane board, unscrew the 8–14 Phillips #0 or #1 screws on the bottom chassis to lift the top plastic shell (which holds all the keycaps captive) away from the electronics, wash the entire top plastic assembly in the sink, and dry it for 12 hours before reassembling.
3. Shared Workstations and Hot-Desking Protocols
In hot-desking, hospital, or call-center environments where multiple staff share a keyboard daily, microbial sanitization takes priority over deep disassembly. Before starting your shift, unplug the USB cord (or turn off wireless power) and wipe all keycaps and the wrist rest using a pre-moistened 70% isopropyl alcohol wipe (or hospital-grade quaternary ammonium electronics wipe—never bleach wipes). Squeeze excess liquid out of the wipe first if it looks dripping wet, and leave the thin film of alcohol undisturbed on the keys for 30 to 60 seconds of wet contact time before typing so the solvent kills surface bacteria and enveloped viruses.
How Long Does It Take and What Does It Cost?
| Cleaning Method / Tool | Active Time | Drying Time | Typical Cost | Best Used For |
| Daily Hot-Desk Wipe (70% IPA) | 1–2 mins | 1 min | $3–$8 (per bottle/pack) | Killing surface pathogens between shared office shifts. |
| Phase 1: Weekly Surface Clean | 5–10 mins | 1–2 mins | $6–$15 (Compressed Air Can) | Friday afternoon upkeep for corporate cubicle workers. |
| Cleaning Gel / Slime Press | 3–5 mins | 0 mins | $8–$12 (per reusable tub) | Lifting surface hair and dust silently in open-plan offices. |
| Phase 2: Full Keycap Deep Clean | 60–120 mins | 6–12 hours | $5–$15 (7-in-1 or 10-in-1 Kit) | 6-month overhaul for mechanical keyboards or sticky spills. |
| Electric Air Duster Upgrade | 5 mins | 0 mins | $25–$45 (One-time purchase) | Offices cleaning 5+ keyboards; replaces disposable air cans. |
Frequently Asked Questions
How often should I clean my office keyboard?
For a dedicated desk, perform a 5-minute surface clean (inversion shake, compressed air blast, and 70% alcohol wipe) every Friday afternoon, and execute a full deep-clean keycap wash every 6 months. If you use a shared hot-desk workstation, sanitize the keycaps with a 70% alcohol wipe daily before every shift.
Can I use Clorox or Lysol disinfecting wipes on a keyboard?
Standard household wipes that are bleach-free and contain alkyl dimethyl benzyl ammonium chloride (or 70% alcohol) are safe if you wring out the wipe first so no liquid drips into the keys. Never use sodium hypochlorite (bleach) wipes, as bleach oxidizes metal switch contacts and degrades ABS plastic.
Why is 70% isopropyl alcohol better than 99% for cleaning keycaps?
70% isopropyl alcohol contains 30% purified water, which slows down evaporation so the solution stays in contact with the plastic for 30+ seconds—giving the alcohol time to cross bacterial cell membranes and denature proteins. Reserve 91%–99% alcohol exclusively for flushing inside electronic switches where water must be avoided.
Can I put my keyboard keycaps in the dishwasher or a mesh laundry bag?
Never put keycaps in a dishwasher. Dishwasher heating elements reach 65°C–75°C (150°F–167°F), which permanently warps ABS keycaps and ruins alignment stems, while harsh dishwasher detergents etch away key legends. Always hand-soak keycaps in a bowl of 38°C–43°C (100°F–110°F) water with mild liquid dish soap.
Is keyboard cleaning gel or slime actually safe to use?
Cleaning gel is safe for flat laptop keyboards and sealed membrane boards when pressed lightly for 1–2 seconds and lifted straight up. However, avoid pressing cleaning slime hard into exposed mechanical switches—if the gel warms up from your hands, fragments tear off and gum up the mechanical return springs.
Mastering how to clean an office keyboard comes down to respecting the barrier between dry mechanical dislodgement and controlled liquid solvents. By running the 10-minute Phase 1 routine weekly and reserving Phase 2’s deep keycap soak for mechanical boards every six months, you keep your switches crisp, hygienic, and completely free of short circuits.