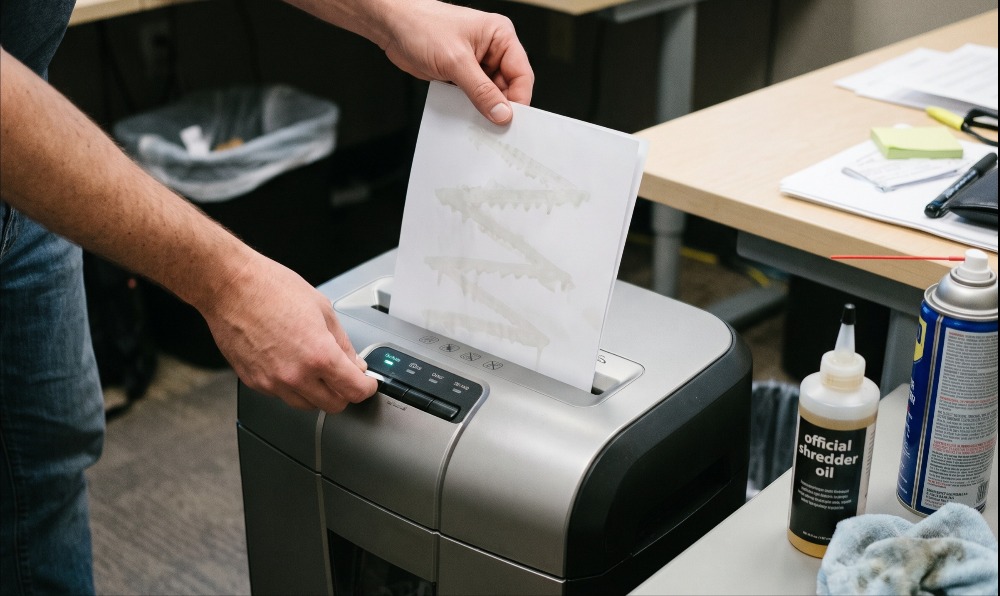
Learning how to maintain a paper shredder prevents 90% of motor burnouts, clears dulling paper dust, and stops mid-sheet jams before they start. In eight sequential steps-clearing the bin, extracting blade wedges, purging optical sensors, wiping the throat, preparing an oil carrier sheet, feeding the lubricant, reverse-cycling the gears, and blotting excess grease-you will restore factory cutting torque in 5 minutes with basic household tools. Success depends on one rule: lubricate the steel cutting shafts with 100% mineral or synthetic shredder oil every time the waste bin hits 75% capacity.
Before You Start: Specs, Tools, and Prerequisites
- Total Time Required: 5 minutes (3 minutes cleaning, 2 minutes lubricating)
- Difficulty Level: Beginner (No mechanical disassembly required)
- Estimated Cost: $0.15–$0.40 per maintenance cycle ($8–$15 for a 16 oz bottle of shredder oil lasting 30+ cycles)
- Prerequisite Conditions: The shredder motor must be cool to the touch. If the thermal overload indicator is lit, wait 30–45 minutes before starting.
Tools and Materials Checklist
| Item | Specification / Standard | Purpose | Quantity / Setting |
| Shredder Oil | Official synthetic shredder oil or 100% USP food-grade mineral oil | Lubricates steel cutting cylinders and stripper plates | 1 tablespoon (15 mL) per cycle |
| Compressed Air | Non-flammable electronics duster can with nozzle straw | Blasts microscopic paper dust off infrared (IR) sensors | 3–4 bursts (1 second each) |
| Microfiber Cloth | Lint-free weave | Wipes adhesive residue and dust from the feed throat | 1 cloth, dampened with water only |
| Long Tweezers | 6-inch (150 mm) metal hemostat or rigid plastic tweezers | Extracts compacted paper wedges from between teeth | Manual extraction (Unit unplugged) |
| Scrap Paper | Standard letter/A4 size, 20 lb (75 gsm) uncoated bond | Acts as the oil carrier and post-lube blotting sheet | 3 sheets total per cycle |
| Cotton Swabs | Tightly wound tip (plus 90% Isopropyl Alcohol for glue) | Polishes the recessed optical sensor lenses | 1–2 swabs |
CRITICAL FIRE WARNING: Never spray aerosol lubricants (such as WD-40, silicone spray, or liquid wrench) into a paper shredder, and never use compressed air while the unit is plugged in. Most home and office shredders use brushed universal AC motors that generate open electrical sparks during operation. Aerosol propellants (propane, butane, or difluoroethane) accumulate inside the enclosed motor housing and will ignite on startup, causing an explosion or blowtorch fire. Additionally, never use vegetable, canola, olive, or baby oil—plant oils oxidize into a sticky varnish that seizes steel gears, while scented baby oils dissolve internal ABS plastic spacers.
Phase 1: Mechanical Cleaning and Sensor Purging
Paper dust is an abrasive insulator: it packs into the 0.5 mm clearances between cutting rings and coats optical sensors until the machine refuses to start or runs nonstop. Perform this 3-minute dry clean before introducing any liquid oil, or the oil will turn existing dust into hard papier-mâché paste.
Step 1: Run a Reverse Purge and Disconnect Power
Clear loose paper fragments from the cutting deck and completely isolate the shredder from electrical current.
- With the shredder plugged in, flip the control switch to Reverse (REV) for 3 to 5 seconds. This backs out unshredded leading edges so confetti does not dump onto your floor when you open the unit.
- Switch the unit to Off (O) and pull the power cord completely out of the wall outlet.
- Pull out the waste pull-bin or lift the cutter head off the basket. Empty the shredded waste if the bin is at or above 75% capacity.
- You’ll know it worked when: The power cord plug is visible in your hand, all LED status lights on the top bezel are completely dark, and the waste bin is empty.
- Common mistake to avoid: Never rely solely on the top power switch or safety interlock when inspecting blades. Pet hair, shirt cuffs, or metal tweezers can bridge a faulty switch if the wall plug remains energized.
Step 2: Extract Trapped Paper Wedges from the Cutter Teeth
Remove compacted paper strips wedged between the underside cutting cylinders using 6-inch tweezers.
- Lay two sheets of newspaper on a flat table. If you have a lift-off head shredder, flip the head upside-down onto the newspaper to expose the underside cutting shafts. If you have a pull-out cabinet model, shine a flashlight upward into the cutting chamber from inside the bin cavity.
- Inspect the twin steel shafts—specifically the narrow metal stripper rings (spacer plates) sitting between each V-shaped cutting tooth.
- Grip any white compacted paper chords with your long tweezers and pull them out parallel to the blade angle (along the groove, not straight across the sharp teeth).
- You’ll know it worked when: You can see bare, shiny steel inside every groove along the full width of both shafts, with no compressed paper collars wrapping around the axle.
- Common mistake to avoid: Do not pry sideways against the thin metal stripper plates with a flathead screwdriver. Bending a stripper plate by even 1 mm causes it to rub against the rotating tooth next to it, creating a permanent metallic clicking sound.
Step 3: Purge the Optical and Mechanical Feed Sensors
Blast accumulated paper lint out of the center auto-start sensor eyes using vertical bursts of compressed air.
- Locate the auto-start sensor inside the center of the paper entry throat. On electronic models, this looks like two tiny clear or dark glass beads (an infrared LED emitter and receiver) facing each other 10 to 20 mm inside the slot. On budget mechanical models, it is a black plastic trigger arm.
- Hold your compressed air can strictly upright (within 15 degrees of vertical) and insert the straw tip 1 inch from the center of the feed slot.
- Trigger 3 to 4 short bursts (1 second each) across the sensor housing.
- Insert a dry cotton swab into the center slot and rub the upper and lower sensor lenses firmly for 5 seconds to wipe away electrostatic dust film.
- You’ll know it worked when: The glass sensor beads inside the throat look glossy and transparent under a flashlight rather than chalky gray.
- Common mistake to avoid: Never tilt or invert the compressed air can to reach underneath the head. Tilting sprays liquid propellant at -40°C (-40°F), which thermal-shocks the glass infrared diode and leaves a permanent frost film that tricks the shredder into thinking paper is stuck inside.
Step 4: De-Gum the Feed Throat and Entry Rollers
Wipe away envelope glue, postage stamp adhesive, and skin oils from the plastic entry slot using a damp microfiber cloth.
- Moisten one corner of your lint-free microfiber cloth with plain tap water and wring it out until no droplets form when squeezed.
- Wipe the entire length of the plastic entry slot and any accessible rubber intake rollers.
- If you feel sticky ridges left by self-seal envelopes or shipping labels on the plastic throat, moisten a cotton swab with 90% Isopropyl Alcohol (IPA) and scrub the plastic lip until smooth. Keep alcohol away from rubber rollers to prevent drying out the rubber.
- Allow the throat to air-dry for 60 seconds.
- You’ll know it worked when: Running a dry fingertip along the plastic entry lip feels completely slick with zero tackiness or black ink smudge.
- Common mistake to avoid: Never spray glass cleaner or soapy water directly into the throat. Surfactants trickle down onto the steel cutter shafts and strip away the protective oil barrier, inviting flash rust in humid rooms.
Phase 2: Cutting Shaft Lubrication and Distribution
Cross-cut and micro-cut shredders rely on tight shearing tolerances where steel teeth scrape against adjacent steel teeth thousands of times per minute. Lubricating coats these friction points, drops operating decibels by 3–5 dB, and flushes microscopic paper fibers out of the cutter grooves.
Step 5: Prepare a Leak-Proof Oiled Carrier Sheet
Create an oil-filled paper envelope using two sheets of 20 lb bond paper and 1 tablespoon (15 mL) of shredder oil.
- Lay one sheet of standard 20 lb (75 gsm) letter/A4 scrap paper flat on a hard surface.
- Uncap your shredder oil bottle and squeeze a continuous broad zigzag pattern from the far left margin to the far right margin, stopping 0.5 inches (12 mm) from all four edges so oil does not squeeze out the sides. Follow with one straight line down the middle—using roughly 1 tablespoon (15 mL) total.
- Place a second dry sheet of paper directly on top of the oiled sheet (or fold a single sheet in half like a hamburger) to sandwich the oil inside. Most guides skip this second sheet, causing raw oil to coat the rubber entry rollers and make future pages slip.
- You’ll know it worked when: The paper shows a translucent, saturated zigzag pattern across 70% of its width, but the outer surfaces and edges feel dry to the touch with no oil dripping off the corners.
- Common mistake to avoid: Never squirt oil directly down into the open feed slot without paper. Direct pouring only coats 30% of the shaft’s rotation arc and pools in the bottom of the plastic housing, where it drips into the waste bin for weeks.
Step 6: Feed the Oiled Carrier Sheet into the Throat
Shred the oiled paper sandwich straight down the center of the feed slot to transfer lubricant onto the active cutting blades.
- Seat the shredder head firmly back onto the waste bin until you hear the safety interlock switch click into place.
- Plug the power cord into the wall outlet and set the power switch to Auto (On).
- Hold the 2-sheet oiled sandwich vertically and feed it squarely into the center of the entry throat. Let the machine pull the entire sheet through until the motor automatically stops (or until the bottom edge disappears below the blades).
- Pro Tip for Neglected Shredders: If you haven’t oiled the machine in over 3 months, switch the unit Off the exact second the middle of the oiled sheet is inside the blades. Let it sit for 2 minutes so the mineral oil softens baked-on paper resin before finishing the cut.
- You’ll know it worked when: The oiled sandwich passes completely through the cutting cylinders into the waste bin without stalling, and the motor pitch sounds noticeably lower and smoother by the end of the sheet.
- Common mistake to avoid: Do not use heavy cardstock, glossy magazine pages, or thermal receipt paper as your oil carrier. Glossy clay coatings repel mineral oil instead of absorbing it, and cardstock absorbs too much oil to release it onto the steel teeth under compression.
Step 7: Cycle in Reverse to Coat the Rear Cutting Edges
Run the shredder in Reverse mode for 15 seconds immediately after the oiled sheet clears the blades.
- Within 2 seconds of the oiled sheet dropping into the bin, flip the power switch to Reverse (REV).
- Hold or leave the switch in Reverse for a full 10 to 15 seconds. Forward shredding only presses oil against the front shearing face of each cross-cut tooth; running backward forces the pooled oil rings across the rear relief angles and inside the stripper plate channels.
- You’ll know it worked when: The high-pitched metallic squeak or dry chattering noise disappears completely within the first 5 seconds of reverse rotation, replaced by a quiet, steady mechanical hum.
- Common mistake to avoid: Do not toggle rapidly between Forward and Reverse while the oiled sheet is still halfway through the throat unless clearing a jam. Let the sheet clear the teeth first so shredded wet strips don’t wrap backward around the upper guide shafts.
Step 8: Run a Dry Purge Sheet to Blot Excess Oil
Shred one clean, dry sheet of 20 lb paper in Forward mode to wipe away pooled oil droplets and verify sensor reset.
- Switch the shredder back to Auto / Forward and let the blades spin empty for 5 seconds.
- Feed 1 dry sheet of scrap paper straight through the center of the throat.
- Wait 2 seconds after the dry sheet drops into the bin to confirm the optical auto-start sensor automatically stops the motor, then switch the main power to Off (or leave in Standby if used daily).
- You’ll know it worked when: The shredder stops automatically within 2 seconds of the dry sheet clearing the throat, and the newly shredded strips in the bin show only faint, tiny oil flecks along their cut edges rather than wet puddles.
- Common mistake to avoid: Skipping the dry blotting sheet leaves heavy beads of oil hanging on the bottom teeth; the next time you shred a single receipt or envelope, the wet blades will paste the thin paper against the stripper rings and trigger a wrap-around jam.
Common Mistakes and How to Fix Them
Even well-maintained shredders encounter mechanical stalls when pushed past their thermal or sheet-thickness limits. Use these recovery protocols to fix the five most common failure modes without stripping the internal nylon drive gears.
1. Severe Mid-Sheet Paper Jam (Motor Stalls and Hums)
- Why it happens: Feeding more than 80% of the rated sheet capacity (e.g., stuffing 12 folded pages into a 10-sheet unit) or feeding a crooked stack that binds at the outer corners.
- How to fix it:
- Immediately switch the unit to Reverse (REV) for 5 seconds, then back to Forward/Auto for 3 seconds. Repeat this rocking cycle up to 3 times to back the paper wedge out.
- If the blades remain locked, unplug the unit immediately—continuing to power a stalled motor for more than 10 seconds melts the internal nylon reduction gears.
- Pour a generous line of shredder oil directly along the top crease of the jammed paper protruding from the throat and wait 5 minutes for the oil to wick down into the compressed paper fibers.
- Plug the unit in and try one Reverse-Forward cycle. If still frozen, unplug the unit, use long tweezers to pull cut fragments out from the underside of the blades, then press a stiff piece of 110 lb cardstock or an expired credit card down into the center of the throat to push the remaining accordion folds through.
2. Shredder Runs Continuously in Auto or Reverse (Phantom Running)
- Why it happens: Microscopic paper dust, a stray paper sliver, or dried envelope adhesive is blocking the infrared beam or wedging the mechanical paddle switch in the center of the throat, fooling the control board into thinking a page is still entering.
- How to fix it: Unplug the shredder. Fold a dry paper towel into a thick 4-layer strip (roughly 2 inches wide). Dip the tip in 90% Isopropyl Alcohol, insert it straight down into the center of the feed slot, and scrub vigorously back and forth across the middle 3 inches of the slot for 10 seconds. Follow with three 1-second bursts of upright compressed air.
3. Sudden Mid-Operation Shutdown (Motor Dead, Thermal Light On)
- Why it happens: Exceeding the machine’s duty cycle ( typically 2 to 5 minutes of continuous running on home units, or 10 to 30 minutes on small office units), which trips the bi-metallic thermal overload cutout switch on the motor windings.
- How to fix it: Flip the power switch to Off and unplug the unit. Leave the shredder untouched in a room-temperature area for 30 to 45 minutes (up to 60 minutes for compact deskside units without internal cooling fans). Never try to speed this up by spraying compressed air into the motor vents, as rapid localized cooling can crack hot ceramic components. Once cooled, the thermal breaker resets automatically.
4. Loud Metallic Squeaking, Grinding, or Clicking
- Why it happens: Dry metal-on-metal friction between the cutting cylinders and the stationary stripper plates, or a staple/paperclip wedged sideways inside a cross-cut tooth.
- How to fix it: Unplug the unit and inspect the underside of the cutter shafts with a flashlight. Use needle-nose pliers or hemostat tweezers to extract any bent metal staples caught in the V-grooves. Once clear of metal debris, run Phase 2 (Steps 5–8) twice back-to-back using two oiled carrier sheets and a 20-second Reverse cycle.
5. Totally Dead Unit (No Lights, No Motor Hum When Plugged In)
- Why it happens: The safety interlock switch between the shredder head and the waste bin is disengaged, preventing power from reaching the main PCB.
- How to fix it: Check the rim where the shredder head meets the bin—a single strip of shredded paper trapped on the lip can hold the safety plunger up by 2 mm. On pull-out bin models, inspect the plastic tab on the top rear edge of the bin to ensure it isn’t snapped off, and push the bin firmly until it sits completely flush with the front housing.
Maintenance Variations for Different Shredder Types
Not all shredders wear at the same rate. Adjust your maintenance cadence and method based on your machine’s security cut level (DIN 66399 standard) and lubrication hardware:
1. Micro-Cut (P-5 / P-6) vs. Cross-Cut (P-4) vs. Strip-Cut (P-2)
- Micro-Cut Shredders (particles ≤ 2 x 12 mm): Because micro-cut shafts have up to 3x more cutting teeth per inch with tighter tolerances, paper dust packs into the teeth rapidly. You must oil a micro-cut shredder every 15 to 20 minutes of cumulative runtime—which equals roughly twice per waste bin empty (once at 40% full, and again when emptying at 75–80% full).
- Cross-Cut Shredders (particles ~ 4 x 40 mm): Follow the standard schedule—oil every 30 minutes of cumulative runtime or every single time you empty the waste bin.
- Strip-Cut Shredders (long ribbons ~ 6 mm wide): Strip-cut blades rotate continuously in one plane without horizontal cross-shearing teeth. They only require oiling once a month or every 2 to 3 bin empties, and rarely trap paper wedges underneath unless overfed.
2. Using Pre-Lubricated Shredder Oil Sheets (No-Mess Alternative)
If you want to skip measuring liquid oil in Steps 5 and 6, use commercial shredder lubricant sheets (such as Fellowes Powershred Lubricant Sheets or Amazon Basics Shredder Sharpening & Lubricating Sheets).
- How the process changes: Do not fold or open the pouch. Feed 1 pre-oiled sheet directly into the throat just like a standard piece of paper, run the unit in Reverse for 10 seconds (Step 7), and skip the dry blotting sheet (Step 8), as pre-measured sheets contain exactly 5–7 mL of non-dripping lubricant pressed into sugarcane or wood-pulp fibers.
3. Commercial Auto-Oil Shredders (Dahle, HSM, High-End Fellowes)
High-volume departmental shredders often include an external or internal automatic oiler reservoir coupled to a peristaltic pump.
- How the process changes: Skip Phase 2 entirely. Instead, inspect the clear plastic oil reservoir window weekly and top it off before the fluid drops below the 20% minimum line so air bubbles do not enter the feed tubes. Use only the manufacturer’s specified viscosity oil-thick generic mineral oils can clog micro-drip nozzles on automated manifolds.
How Long Does It Take and What Does It Cost?
Maintaining a paper shredder takes less than 1 hour of total effort per year and costs pennies per cycle compared to replacing a burned-out unit.
| Maintenance Frequency / Metric | Light Home Use (10–30 sheets/day) | Home Office / SMB (50–150 sheets/day) | Heavy Departmental (300+ sheets/day) |
| Maintenance Cadence | Once a month (or every bin empty) | Every 1–2 weeks (every bin empty) | Every 30 minutes of active runtime |
| Time per Session | 5 minutes | 5 minutes | 2 minutes (oil) + 5 minutes weekly clean |
| Oil Cost per Cycle | ~$0.20 (using 16 oz liquid bottle) | ~$0.20 (liquid) or $0.85 (oil sheet) | ~$0.15 (bulk 1-gallon jug) |
| Annual Maintenance Cost | $2.50 – $5.00 / year | $10.00 – $25.00 / year | $35.00 – $60.00 / year |
| Expected Machine Lifespan | 7–10+ years (vs. 1–2 years unmaintained) | 5–8 years | 7–12 years |
Frequently Asked Questions (FAQ)
Can I use vegetable oil, olive oil, or WD-40 to oil a paper shredder?
Never use cooking oils or WD-40 in a paper shredder. Vegetable, canola, and olive oils oxidize when heated by blade friction, turning into a sticky rancid varnish that glues paper dust inside the cutter teeth and stalls the motor. WD-40 contains flammable hydrocarbon propellants that ignite from internal motor brush sparks, creating a severe explosion hazard.
What household oil is a safe substitute for official shredder oil?
The only safe household substitute for commercial shredder oil is 100% pure, unscented USP food-grade mineral oil (sold in pharmacies as a liquid laxative or in kitchen stores as cutting board oil). It is petroleum-derived, non-flammable at shredder operating temperatures, will not go rancid, and will not degrade internal ABS plastic gears.
Can you sharpen paper shredder blades with aluminum foil?
Shredding aluminum foil does not sharpen paper shredder blades. Unlike thin household scissors, shredder cutting cylinders are milled from hardened carbon steel blocks that rely on tight lateral shearing clearance rather than knife-like edges. Aluminum foil is soft and ductile; it smears across the steel teeth, packs into the stripper rings, and causes severe binding jams.
How often should I oil a cross-cut or micro-cut paper shredder?
Oil a standard cross-cut shredder every time you empty the waste bin or after every 30 minutes of cumulative runtime. For high-security micro-cut shredders, oil the blades every 15 to 20 minutes of runtime (roughly twice per bin empty), because their finely spaced teeth generate twice the friction and trap microscopic paper dust much faster.
Can I shred staples, paperclips, and credit cards without damaging the blades?
Most cross-cut shredders rated for 8+ sheets can safely cut standard #10 wire staples and small #1 paperclips, though removing them extends blade sharpness by 30%. Never shred large binder clips or industrial heavy-duty staples. Only shred plastic credit cards or CDs if your machine designates a specific throat zone for them, and feed them one at a time.
Making this 5-minute routine a habit is the simplest way to master how to maintain a paper shredder for a decade of trouble-free service. Keep your 16 oz oil bottle and microfiber cloth stored right next to the waste bags inside the bottom of your shredder cabinet—that way, every time you pull a full bag at 75% capacity, your tools are already in your hand to clean the sensors and run an oiled sheet before you walk away.