Learning how to sit properly at a desk requires aligning your skeleton into a neutral spinal “S” curve across eight sequential adjustments: anchoring your pelvis, setting seat height, adjusting pan depth, placing lumbar support, calibrating backrest recline, leveling armrests to your desk, positioning your monitor, and centering your peripherals. The setup takes 10 minutes, requires zero technical skill, and succeeds when your chair carries your upper body weight rather than your paraspinal muscles.
Before You Start: Workstation Calibration Overview
- Time Required: 10 to 15 minutes (initial setup); 2 to 4 weeks for neuromuscular adaptation.
- Difficulty Level: Beginner (no tools required).
- Typical Cost Range: $0 (using existing adjustability and household risers) to $1,800+ (full BIFMA-certified commercial setup).
- Equipment & Materials Checklist:
- Adjustable Task Chair: Must feature pneumatic height control, lumbar support, and backrest tilt (Entry: $150–$300; Premium like Herman Miller Aeron or Steelcase Leap: $800–$1,800).
- Work Surface: Standard fixed desk (28–30 inches high) or dual-motor electric sit-stand desk ($400–$1,200).
- Detached Keyboard and Mouse: Required if working on a laptop.
- Footrest Block or High-Density Foam Roll ($20–$50): Mandatory if your desk is fixed at 29+ inches and you are under 5’10” (178 cm).
- Tape Measure: Capable of measuring up to 36 inches (90 cm).
- Prerequisite Conditions: Empty your back pockets (wallets and phones twist the pelvis laterally), wear your normal indoor footwear, and unlock all chair levers before sitting.
Phase 1: Establish Your Pelvic and Lower-Body Foundation
Your pelvis controls the entire spinal column. If your lower body is unanchored or your knees sit at the wrong elevation, your lumbar spine automatically flattens into a “C” shape, doubling intradiscal pressure within minutes.
Step 1: Anchor Your Sit Bones Against the Backrest
Sit down and wedge your hips all the way into the rear crease of the chair before leaning your torso back.
Stand in front of your chair, sit near the center of the seat pan, and hinge your torso forward at a 45-degree angle. Use your feet to push your glutes backward until your tailbone touches the lower backrest, then bring your torso upright. This specific hinge prevents sacral sitting (slouching with the pelvis tucked under), ensuring your weight rests directly on your ischial tuberosities (the two bony prominences at the base of your pelvis) rather than your soft tailbone.
- Success Checkpoint: You’ll know it worked when you feel two distinct, firm pressure points beneath your glutes and zero gap between your beltline and the base of the chair back.
- Common Mistake: Sitting down and immediately leaning your shoulder blades against the backrest. This leaves a 3-to-5-inch void behind your lower back, causing your pelvis to slide forward within 10 minutes.
Step 2: Set Seat Height and Foot Contact
Adjust your pneumatic chair lever until your thighs angle slightly downward at a 90-to-105-degree hip-to-torso angle with your feet planted flat.
Reach beneath the right side of your seat pan and pull the pneumatic height lever. Raise or lower the seat until the crease of your hip sits at the exact level of-or up to 1.5 inches (4 cm) higher than-the center of your kneecap. Your knees should flex at a 90-to-105-degree angle, keeping your thighs roughly parallel to the floor while gently opening the hip flexors.
- The Fixed-Desk Exception: If you use a non-adjustable desk (typically 29 to 30 inches high) and lowering your chair to the floor leaves your elbows below the desk surface, raise the chair until your elbows match the desk height first, then place a 3-to-5-inch ergonomic footrest under your feet. Never leave your feet dangling or tucked under the chair base.
- Success Checkpoint: You’ll know it worked when you can slide a flat hand under your mid-thigh with light friction, and your heels bear equal weight to the balls of your feet.
- Common Mistake: Hooking your heels onto the five-star wheeled base of the chair. This compresses the hamstring tendons, cuts off venous blood return in the lower legs, and pulls the pelvis out of alignment.
Step 3: Adjust Seat Pan Depth for Knee Clearance
Slide the seat pan forward or backward until exactly 2 to 3 inches (5 to 7.5 cm) of open space remains between the front waterfall edge of the seat and the back of your calves.
Locate the seat-depth slider lever (usually under the front-left rim of the seat pan). Hold the lever up and glide the seat pan so it supports roughly 75% to 80% of your total thigh length without contacting the popliteal fossa (the nerve-and-vessel-rich hollow behind your knee). Measure the gap by placing three to four fingers horizontally behind your knee.
- No Seat Slider Fix: If your chair has a fixed seat pan that is too deep and presses against your calves, place a 2-to-3-inch high-density foam lumbar pillow ($20–$35) behind your lower back to shift your pelvis forward without losing spinal contact.
- Success Checkpoint: You’ll know it worked when three flat fingers fit comfortably between the seat’s front edge and the back of your knee while your hips remain pinned to the backrest.
- Common Mistake: Setting the seat pan as far forward as possible for “more cushion,” which pinches the tibial nerve and femoral vein, causing cold feet and lower-leg numbness.
Phase 2: Align the Spine and Upper Extremities
Once the pelvis is locked, neutral posture relies on preserving the spine’s three natural curves: lumbar lordosis (inward lower curve), thoracic kyphosis (outward mid-back curve), and cervical lordosis (inward neck curve).
Step 4: Position Lumbar Support Into the L3–L5 Curve
Align the apex (thickest curve) of your chair’s lumbar support so it nests firmly into the inward curve of your lower spine, right above your beltline.
Reach behind your back with both hands, locate the top edge of your pelvic bone (iliac crest), and move your fingers 1 to 2 inches upward-this is your L3–L5 lumbar curve. Slide your chair’s vertical lumbar pad up or down until its most prominent bulge presses into that exact hollow. If your chair features depth tension (common on Steelcase and Herman Miller models), dial the tension forward until it supports your arch without pushing your stomach outward.
- Success Checkpoint: You’ll know it worked when you can relax your abdominal and lower-back muscles completely without your lower spine flattening or rounding backward.
- Common Mistake: Positioning the lumbar pad too low (against the hard sacrum/buttocks), which shoves the hips forward off the seat pan, or too high (against the lower ribcage), which forces an exaggerated arch.
Step 5: Calibrate Backrest Recline and Tilt Tension
Unlock your backrest to allow a 100-to-110-degree recline angle and tighten the tilt-tension knob until the chair supports your torso weight effortlessly.
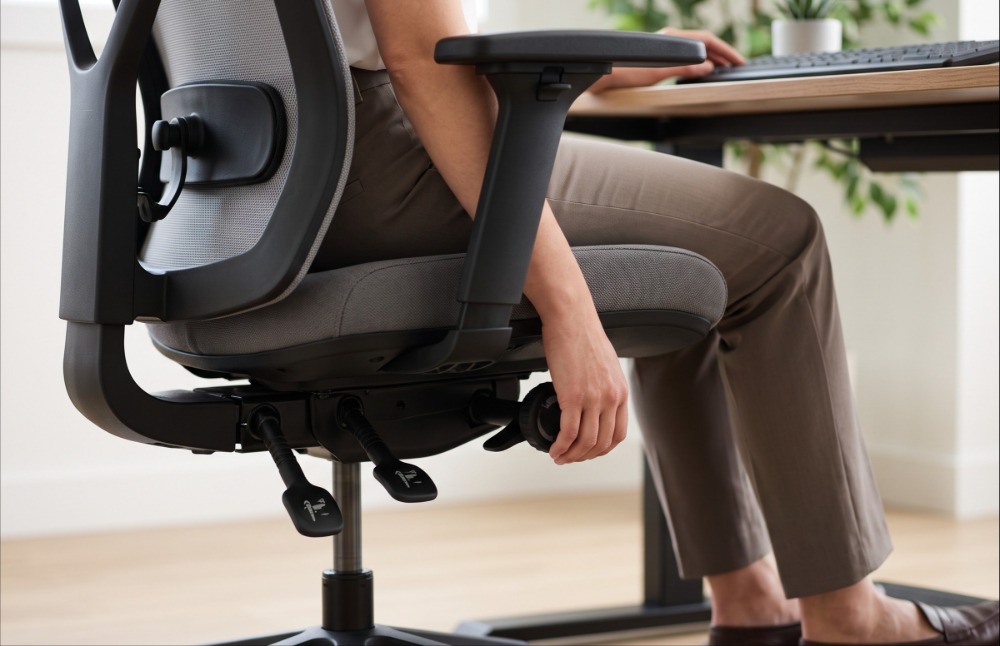
Contrary to popular belief, sitting at a rigid 90-degree military upright angle loads maximum vertical compression onto your lumbar intervertebral discs. Set your chair’s tilt limiter so the backrest reclines 10 to 20 degrees past vertical (a 100-to-110-degree torso-to-thigh angle). Next, turn the large round tension knob beneath the seat clockwise (to stiffen) or counterclockwise (to loosen) until leaning back feels like floating in water-the backrest should hold you up without dropping you backward or shoving you forward.
- Success Checkpoint: You’ll know it worked when you can lean back 10 degrees, take your feet slightly off the floor for one second, and the backrest holds your torso stationary without falling further back.
- Common Mistake: Locking the backrest in the fully upright position all day, which forces your erector spinae muscles to fire continuously and leads to mid-afternoon upper back fatigue.
Step 6: Level Armrests and Desk Height to a 90–100° Elbow Angle
Set your armrests and desk surface so your forearms rest parallel to the floor with your elbows bent at 90 to 100 degrees and your shoulders completely dropped.
Inhale, shrug your shoulders toward your ears, exhale, and let your arms hang dead-weight at your sides. Bend your elbows to a 90-to-100-degree angle. Press the height button on your armrests and bring them up until they just graze the undersides of your forearms without lifting your shoulders even 2 millimeters. If your chair has 3D or 4D armrests, slide the pads inward so your elbows stay tucked directly beneath your acromion (shoulder joints) rather than flared outward. If using a sit-stand desk, set the desk surface exactly even with your armrest height.
- Success Checkpoint: You’ll know it worked when your upper trapezius muscles (between your neck and shoulder tip) feel soft to the touch while your forearms rest on the pads.
- Common Mistake: Raising armrests too high to “support the arms,” which forces a chronic micro-shrug that triggers tension headaches and cervical tightness within two hours.
Phase 3: Calibrate Visual Field and Peripheral Reach
Even a perfectly adjusted chair fails if your monitor or keyboard forces your head or hands to reach out of neutral alignment.
Step 7: Set Monitor Distance and Tilt Angle
Place your primary monitor directly in front of your nose at a distance of 20 to 30 inches (50 to 76 cm), with the top line of screen text at or 1 to 2 inches below eye level.
Sit back against your lumbar support and extend your dominant arm straight forward; your middle fingertip should brush the center of your display (roughly 20 inches for 22–24 inch screens, and 27 to 30 inches for 27–32 inch monitors). Adjust the monitor stand or VESA arm height so the top bezel sits at eyebrow level, putting the top line of active text right at or slightly below horizontal eye level. Tilt the screen backward by 10 to 20 degrees so the display surface remains perpendicular to your natural downward gaze (which drops 15 degrees when relaxed).
- Bifocal / Progressive Lens Exception: If you wear progressive lenses, lower the monitor an additional 2 to 3 inches so you do not tilt your chin upward to read through the bottom segment of your glasses.
- Success Checkpoint: You’ll know it worked when you can close your eyes, relax your neck, open your eyes, and find your gaze landing naturally on the upper-third address bar or menu area of the screen.
- Common Mistake: Using a bare laptop directly on a desk. Looking down at a laptop screen forces a 35-to-45-degree neck flexion (Forward Head Protraction or “Tech Neck”), adding up to 30 pounds (13.6 kg) of leverage strain onto your cervical spine. Always elevate a laptop on a riser and attach an external keyboard.
Step 8: Arrange Keyboard, Mouse, and Movement Cadence
Center the letter “B” of your keyboard directly in front of your navel, fold the bottom keyboard kickstands flat, and lock in a 20-to-30-minute micro-break cadence.
Pull your keyboard to within 2 to 4 inches of the desk’s front edge so your elbows stay directly under your shoulders. Flip the plastic kickstand feet underneath your keyboard closed-raising the back of a keyboard forces wrist extension (bending hands backward), which pinches the median nerve inside the carpal tunnel. Place your mouse directly adjacent to the keyboard edge so your right arm does not abduct (wing outward). Finally, set a repeating timer for a 20-to-30-minute sitting cadence followed by a 2-minute standing or walking break, and apply the 20-20-20 visual rule (every 20 minutes, focus on an object 20 feet away for 20 seconds).
- Success Checkpoint: You’ll know it worked when a straight ruler placed along the back of your forearm continues in a flat, unbroken line across your wrist to your middle knuckle while typing.
- Common Mistake: Centering the entire width of a full-size 100% keyboard (including the number pad) with your body. Because the alphanumeric keys sit on the left half, centering the whole frame shifts your typing posture left and forces your mouse arm 6 inches outside shoulder width.
Quick-Reference Numerical Standards
| Ergonomic Parameter | Target Specification | Physiological Purpose |
| Hip & Knee Flexion Angle | 90° to 105° | Prevents femoral artery compression and hip flexor shortening |
| Backrest Recline Angle | 100° to 110° (10°–20° past vertical) | Offloads axial compression from L4–L5 and L5–S1 lumbar discs |
| Seat Pan Knee Clearance | 2 to 3 inches (5 to 7.5 cm / 3–4 fingers) | Protects popliteal nerves and lower-limb venous return |
| Elbow Flexion Angle | 90° to 100° | Eliminates upper trapezius shrugging and rotator cuff strain |
| Eye-to-Screen Distance | 20 to 30 inches (50 to 76 cm / 1 arm’s length) | Prevents ciliary muscle accommodation spasm and forward head drift |
| Monitor Tilt Angle | 10° to 20° backward | Matches screen plane to the eye’s natural 15° downward resting gaze |
| Movement Cadence | Sit 20–30 mins $\rightarrow$ Move 2 mins | Restores synovial joint fluid lubrication and localized blood flow |
Common Mistakes and How to Fix Them
Even after following the 8-step setup, daily work habits can pull your body out of alignment. Use these diagnostic fixes to eliminate localized pain immediately:
1. Lower Back Ache After 60 Minutes (Sacral Slippage)
- Why It Happens: Your hips gradually slide forward on a slick seat pan, collapsing your lumbar curve into a “C” shape and doubling disc pressure.
- How to Fix It: Slide your hips all the way back using the Step 1 hip-hinge. If they slide forward again, your chair is likely too high-lower the pneumatic cylinder by 1 inch or place an angled footrest ($25) under your feet so heel pressure naturally pushes your pelvis backward into the lumbar pad.
2. Burning Pain Between Shoulder Blades or Base of Skull (Tech Neck & Abduction)
- Why It Happens: Your monitor text is too small (causing you to crane your chin forward by 2 to 3 inches), or your keyboard and mouse sit too far forward on the desk, forcing your arms to reach out in front of your torso.
- How to Fix It: Increase your operating system or browser font scaling to 125% or 150% immediately, pull the monitor to exactly one arm’s length (20–30 inches), and slide your keyboard and mouse back until your elbows hang vertically underneath your shoulder joints. Check that your armrests aren’t pushing your shoulders upward.
3. Wrist Tingling or Forearm Fatigue (Positive Keyboard Tilt & Edge Contact)
- Why It Happens: Typing with keyboard kickstands deployed (upward tilt) or resting the soft underside of your wrists (the carpal tunnel) directly on the hard, sharp edge of the desk while moving your fingers.
- How to Fix It: Fold keyboard feet flat (or use a negative-tilt keyboard tray tilted -5 degrees away from you). When actively typing, hover your wrists parallel to the floor so your large forearm muscles move your hands; only rest your palms (not your wrist creases) on a gel or memory-foam pad during typing pauses.
4. Outer Hip or Sciatic Discomfort on One Side (Asymmetric Loading)
- Why It Happens: Crossing one leg over the other, sitting with one foot tucked under a buttock, or leaving a wallet in a back pocket. This tilts the iliac crest laterally and pinches the sciatic nerve root.
- How to Fix It: Empty all pockets, uncross your legs, and plant both feet flat on the floor or footrest hip-width apart. If you feel the urge to cross your legs, it is a reliable signal that your seat height is 1 to 2 inches too high-lower the chair until your feet bear firm contact.
5. Upper Back or Core Soreness During Week 1 (Stabilizer Adaptation)
- Why It Happens: When transitioning from years of slouching to neutral posture, atrophied postural stabilizers (multifidus, deep cervical flexors, and rhomboids) must adapt to holding your skeleton in alignment.
- How to Fix It: Do not abandon the setup. Mild muscular fatigue during the first 7 days is a normal physiological adaptation; full neuromuscular habit formation takes 2 to 4 weeks. Relieve first-week fatigue by increasing backrest recline to 110 degrees for 15 minutes each hour rather than slumping forward.
Variations: Adapting the Process to Your Setup and Profile
Not every worker uses a standard single-monitor task chair setup. Modify the core steps above based on your hardware configuration and daily workload:
Variation A: Dual-Monitor Workstations
If you use two monitors, positioning them incorrectly guarantees chronic cervical rotation (neck twisting).
- 80/20 Primary-Secondary Split: If you spend 80% or more of your time on one screen, place that primary monitor dead-center in front of your nose (Step 7). Place the secondary monitor immediately to the left or right (matching your dominant eye), angled inward at 30 degrees.
- 50/50 Equal Usage Split: If you use both monitors equally, position the physical bezel seam where the two screens meet directly in front of your nose, and angle both screens inward slightly to create a shallow parabolic arc 24 to 30 inches from your eyes. Swivel your entire chair-not just your neck-when switching views for longer than 30 seconds.
Variation B: Alternative Seating (Sit-Stand Desks, Saddle Stools, Kneeling Chairs)
| Configuration | Setup Modification | Pros | Cons & Usage Limits |
| Sit-Stand Workstation | At standing height, set the desk at elbow level (90°–100° bend) and raise the monitor so the top text line stays at eye level. Stand on an anti-fatigue mat in flat shoes. | Increases calorie burn, stimulates lower-limb circulation, and relieves static lumbar disc compression. | High frame cost ($400–$1,200); standing over 20 mins continuously causes venous pooling and foot fatigue. |
| Active / Saddle Seating | Raise the saddle stool considerably higher than a regular chair until your thighs slope sharply downward at a 120° to 135° hip angle. Requires a raised desk surface. | Automatically rotates the pelvis into anterior tilt, engages core stabilizers, and preserves lumbar lordosis without a backrest. | Lacks upper-body support for relaxation; suited for short-duration tasks, labs, or dental work. |
| Kneeling Chair | Rest shins firmly against the lower pad while centering sit bones on the angled upper pad so the pelvis tilts forward. | Shifts axial load off lumbar discs and onto the shins; helpful during acute disc herniations. | Places direct mechanical stress on knees and shins; unsuitable for full 8-hour workdays. |
Variation C: Adjustments by User Profile
- The Remote Knowledge Worker (8+ Hours Daily): Pair a synchronous-tilt task chair with a dual-motor sit-stand desk. Follow a strict 45/15 workflow: sit properly for 45 minutes, then stand for 15 minutes (never stand for 3+ hours straight, which trades back pain for varicose vein pressure and plantar fasciitis).
- The Creative Professional / Designer (Heavy Mouse, Wacom Tablet, or CAD Use): Utilize 4D armrests pivoted 15 degrees inward to support the entire forearm during micro-movements. Place your drawing tablet directly centered with your torso (moving your keyboard slightly backward or using a compact 65%/75% tenkeyless keyboard) to eliminate chronic right-arm abduction.
- The Student / Budget User (Fixed Dorm Desk & Dining Chair): Fold a thick bath towel into a 4-inch cylinder wrapped with rubber bands and strap it at beltline height for lumbar support (or buy a $25 high-density foam roll). Raise your chair on a firm cushion so your elbows clear the high desk, use two hardcover textbooks or a shoebox as a footrest, elevate your laptop on a stack of books to eye level, and plug in a $20 wireless keyboard and mouse. Set a 30-minute phone alarm to walk around the room.
How Long Does It Take and What Does It Cost?
Implementation Timeframe
- Physical Adjustment: 10 to 15 minutes to dial in all eight mechanical checkpoints.
- Muscular Adaptation: 1 to 7 days of mild upper-back and core muscle awareness as deep spinal stabilizers wake up.
- Habit Automation: 2 to 4 weeks of conscious daily resets before sitting on your sit bones with relaxed shoulders becomes your automatic, unconscious default.
Financial Investment Breakdown
You can achieve 90% of clinical ergonomic alignment for under $50 by retrofitting your current desk, or invest in commercial-grade hardware built to last 12+ years:
- Budget Retrofit Tier ($20 to $50 total): High-density foam lumbar roll ($20–$30), under-desk angled footrest ($20–$35), and an aluminium folding laptop stand ($15–$25).
- Mid-Range Home Office Tier ($300 to $700 total): Entry-level BIFMA-compliant ergonomic mesh chair with adjustable lumbar and 3D armrests ($150–$300, such as the Branch Ergonomic Chair or Sihoo M57) plus a single- or dual-motor standing desk frame ($250–$400).
- Commercial Executive Tier ($1,200 to $3,000 total): Premium dynamic task chair with patented suspension and synchronous tilt ($800–$1,800, such as the Herman Miller Aeron, Embody, or Steelcase Leap V2) paired with a commercial dual-motor sit-stand workstation ($400–$1,200, such as Uplift V2 or Jarvis).
Frequently Asked Questions
Should I lock my office chair upright or leave it unlocked to recline?
Leave your backrest unlocked with a controlled recline limit between 100 and 110 degrees, and calibrate the tilt tension to match your body weight. Dynamic movement (“micro-rocking”) pumps nutrients into avascular spinal discs and reduces lumbar pressure by up to 35% compared to sitting rigidly locked at 90 degrees.
How often should I stand up if I sit properly at a desk?
Even perfect ergonomic posture becomes harmful if held statically. Follow a 20-to-30-minute sitting cadence followed by a 2-minute movement break to restore blood flow, or alternate 45 minutes of sitting with 15 minutes at a standing desk. Static muscle contraction restricts capillary oxygen delivery after 30 minutes.
Why do my shoulders hurt even after lowering my armrests?
If lowering your armrests does not relieve shoulder tension, your desk surface is too high relative to your seat. Raise your chair until your elbows sit at a 90-to-100-degree angle flush with the desk, then place a 3-to-5-inch footrest under your feet so your legs do not dangle.
What is the ideal keyboard type for preventing wrist and shoulder pain?
Use a compact Tenkeyless (TKL, 75%, or 80%) keyboard or a split ergonomic keyboard with the rear kickstands folded flat. Removing the right-side number pad brings your mouse 4 to 5 inches closer to your body’s centerline, eliminating the outward shoulder rotation that strains the rotator cuff.
Can I use a footrest if my feet already touch the floor?
Yes, provided the footrest is low-profile (1 to 2 inches) and dynamically tilts. A rocking footrest encourages ankle flexion and calf-muscle pumping (the venous muscle pump) throughout the day, preventing blood pooling in the lower extremities-just ensure it does not lift your knees higher than your hip crease.
Mastering how to sit properly at a desk is ultimately a combination of mechanical leverage and consistent movement. Once your pelvis is wedged into the backrest, your elbows match your desk height, and your screen meets your horizontal gaze, let the chair carry your weight-and step away from it for two minutes every half hour.