
A desk cable tray is a structured, elevated routing system mounted beneath or along a desk to secure, conceal, and protect power strips, adapters, and data cables. It operates as a central chassis that lifts slack wiring off the floor, eliminating visual clutter, preventing tripping hazards, and ensuring cables move seamlessly with height-adjustable workstations. This fundamental piece of cable management prevents stress on device ports and extends the functional lifespan of every connected cable.
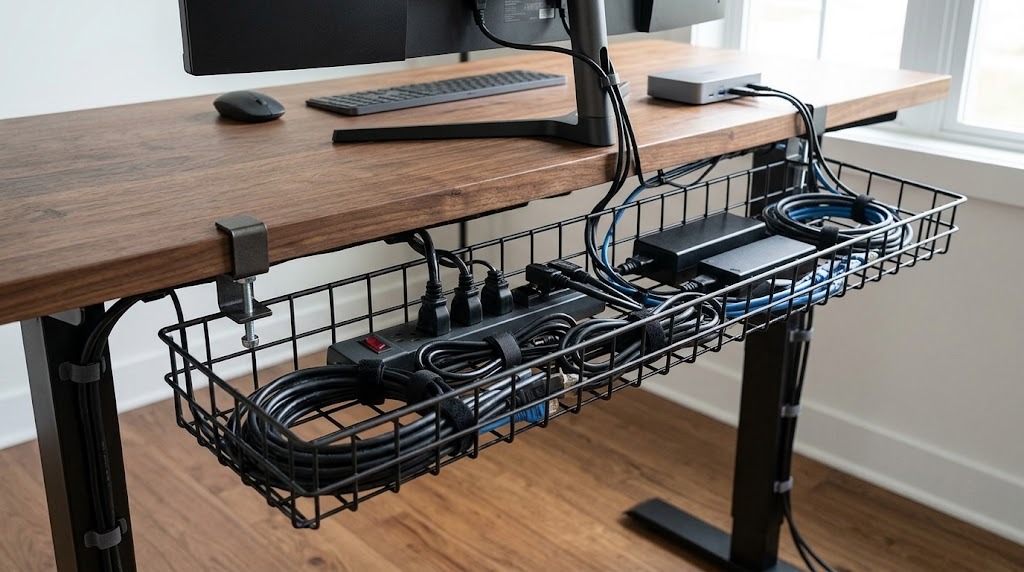
At a Glance: Essential Desk Cable Tray Facts
- Primary Function: To create an elevated, organized raceway for the efficient routing of multi-device power and data systems.
- Essential Application: An absolute requirement for height-adjustable standing desks to manage the large power loop during traversal.
- Key Material Difference: Heavy-duty cold-rolled steel trays support 11–33 lbs (5–15 kg), while plastic models bend and fail under 4 lbs.
- Critical Dimension: Avoid trays narrower than 4.5 inches (11.5 cm) to prevent unsafe cable bending and thermal retention.
- Mounting Profiles: Trays utilize no-drill Clamp-On, seamless Screw-Mounted, or high-bond Adhesive-Mounted installation systems.
What is a Desk Cable Tray and How Does it Function?
A desk cable tray functions as a central, elevated horizontal raceway that is both a physical structure and a semantic barrier for wire organization. Mechanically, it provides a stable platform that suspends large power bricks and multi-outlet surge protectors directly beneath the desktop, anchoring the most dangerous, unmanageable components of a multi-device setup. Its function is to intercept all slack wiring, consolidating power cords, Ethernet lines, and monitor cables into a single bundle that is secured within the tray. This design effectively creates an elevated “chassis” that ensures all connected wires move cohesively, a function that is particularly vital for height-adjustable standing desks, where the rapid vertical transition would otherwise rip short cords from device ports or pull the entire power solution from the desk with violent force.
Beyond basic organization, a proper desk cable tray serves an active protective role. It significantly reduces mechanical wear and tear by preventing cables from twisting, being stepped on, or being crushed. For data transmission, a well-implemented desk cable tray helps mitigate electromagnetic interference (EMI) or “crosstalk” by allowing distinct pathways to be designed within or adjacent to the tray structure, separating high-voltage power runs from sensitive low-voltage data lines. This protective, centralizing structure is fundamental to maintaining a high-functioning, safe, and professional workstation.
The Three Principal Types of Desk Cable Trays
Selecting the correct model of desk cable tray depends entirely on your specific workstation footprint, equipment load, and requirement for thermal management. The market is defined by three main structural designs, each with distinct trade-offs in ventilation, visibility, and weight capacity.
1. Wire Mesh and Basket Trays for Maximum Passive Ventilation
Constructed from welded carbon steel or stainless steel grids, wire mesh and basket trays are defined by their open architecture. Their primary advantage is facilitating maximum passive ventilation to prevent equipment from overheating, a critical feature when securing multiple powerful power bricks or a massive central surge protector. This grid design offers a functional advantage: it allows for incredible flexibility, enabling cables to be cleanly tied down with reusable straps or routed out of the tray at any logical point along the perimeter. These heavy-duty models typically handle static loads between 11 and 33 lbs smoothly and are common in advanced multi-monitor workstations.
2. Solid and Slotted Metal Trays for Seamless Visual Concealment
Solid and slotted metal trays are fabricated from heavy-gauge powder-coated cold-rolled steel or aluminum sheet metal. These designs feature precision punch-out slots, often along the bottom and side walls. The defining characteristic of a solid metal desk cable tray is its ability to completely block the silhouette of messy cords, large adapters, and multi-colored wires from view, offering the cleanest possible aesthetic profile from any viewing angle. The slot pattern provides passive ventilation while still maintaining specific, clean wire routing pathways that maintain the minimal structure of the tray. This type balances concealment with ventilation.
3. Fabric and Mesh Slings for Flexible, Dust-Free Organization
Fabric and mesh slings are constructed from lightweight, fire-retardant woven fabrics suspended from minimal, typically metallic, hook-and-loop or bracket mounting points. They are defined by their inherent flexibility, easily stretching to accommodate oversized power adapters and large power bars that might not fit in rigid steel alternatives. A secondary, highly valuable advantage of this design is that they gather zero dust compared to rigid structures, maintaining a cleaner, hypoallergenic profile. Fabric slings are exceptionally lightweight and create a “soft” organization profile, making them ideal for minimalist setups.
Determining the Ideal Dimensions and Load Capacity for Your Setup
The physical parameters and load capacity of your chose desk cable tray are the most critical factors determining its long-term functionality. Under-sizing is a fundamental error. When determining optimal specifications, you must match your exact equipment load to standardized parameters derived from established ergonomic best practices.
Calculating the Ideal Minimum Dimensions for Your Equipment Load
A desk cable tray must have a minimum length of 23.5 inches (60 cm) to handle even a moderate multi-device setup with a 10-outlet power strip and dual power bricks. For advanced setups with triple monitors, a docking station, and a high-load PC, a larger length of 36–48 inches (91–122 cm) is required. More vital than length is depth. A baseline depth and width of 4.5 inches (11.5 cm) is the absolute minimal dimension required to fit a large horizontal surge protector. Trays narrower than 4 inches are dangerously restrictive. This causes heat retention by preventing passive ventilation and forces you to lay cables vertical to each other, creating excessive friction and causing cords to bend past their maximum safe radius.
Matching Weight Capacities to Power Bricks and Large Surge Protectors
Your desk cable tray must be selected based on static load capacity, which is entirely dictated by its material and mounting mechanism. Standard plastic models bend or fail under 4 lbs (1.8 kg), a weight often exceeded by a single large multi-port surge protector and two standard laptop power bricks. For any reliable workstation configuration, you must select heavy-duty cold-rolled steel or carbon steel trays. These models handle static loads between 11 lbs (5 kg) and 33 lbs (15 kg) smoothly, ensuring the tray does not slowly sag or completely detach over time under the combined weight of high-density equipment.
A Comparative Analysis of Under-Desk Cable Management Solutions
A structured desk cable tray is designed for heavy-density setups with high power demands. However, it is not the ideal solution for every scenario. Below is a comprehensive comparison defining when a desk cable tray is the authoritative answer versus alternate cable management products.
| Management Tool | Best Use Case | Primary Advantage | Major Limitation |
| Desk Cable Tray | Multi-device, heavy power setups, standing desks | Anchors heavy power strips/bricks; highly accessible for modification | Requires continuous under-desk mounting surface |
| J-Channel Raceways | Simple setups with minimal loose peripheral cords | Sleek, tight alignment along desk frame lines | Very limited volume; cannot fit wide power bricks |
| Cable Sleeves / Wraps | Bundling structural runs down to the floor | Highly flexible; moves cleanly with minimal friction | Adding/removing a single wire requires total unwrapping |
| Floor Boxes | Traditional fixed-height workstations with sub-desk storage | Completely clears the desk underside entirely | Cables snag or pull tight if the desk height changes |
Desk Cable Tray Installation: A Detailed Guide by Mounting Profile
The installation profile of a desk cable tray is the direct constraint on your mounting method and required tools. There are three primary ways to achieve a structural mount, ranging from 5 minutes with zero tools to 20 minutes with power tools.
Before You Start: A Critical Checklist
- Desk Material Identification: Confirm your desktop is solid wood, particleboard, MDF, or a hollow honeycomb structure. You cannot use screws on a glass top.
- Underside Clearance: Ensure you have enough continuous flat surface on the underside for the chosen mount.
- Device Placement: Temporarily plug every device in its final location to measure slack and required cable lengths.
Master the 5-Minute Clamp-On (No-Drill) Installation
Clamp-on trays utilize hand-tightened F-clamps or C-clamps gripping the edge of the tabletop. A single-point clamp uses a hand-turn mechanism to apply clamping pressure, while others use a more stable dual-point C-clamp design. A high-quality clamp will feature a soft, non-marring rubber or felt pad to prevent scratching the visible top surface.
- Placement: Identify your final location. A common strategy is to place the clamps 12–24 inches apart along the rear edge, ensuring they do not block monitor mounts.
- Mount: Position the top of the clamp on the desk surface and tighten the bottom screw by hand until it is secure. Repeat for the second clamp.
- Success Checkpoint: Apply firm, downward pressure on the tray structure. You know it is secure when there is no visible tilt or movement. This method is the optimal solution for glass, rental properties, or thin surfaces where drilling is banned.
Achieving a Seamless Look with Screw-Mounted Trays
Securing a desk cable tray directly into the wood underside with short self-tapping wood screws provides a completely seamless aesthetic with zero visible hardware on the top of the desk. This method is common for heavy-duty setups that must handle dynamic movement.
- Preparation: Align the tray on the desk underside in its final position. A critical mistake is using the tray itself to make markings. Instead, use a pencil or painters tape to mark the exact screw hole centers.
- Drilling: If working on a soft material like MDF, use a simple manual awl or a small hand drill to create shallow pilot holes (1/8 inch or less). On hard solid wood, use a power drill with a bit one size smaller than your screws to ensure a secure, bite-free thread.
- Securement: Align the tray over your holes and drive the screws in, ensuring you do not strip the screw head by over-torquing. Start in the center and work outward.
- Success Checkpoint: Hang a heavy object or apply a static 10–15 lb load. The wood should hold the tray absolutely stationary without any creep.
Ensuring a Strong Bond with Adhesive-Mounted Trays
Adhesive-mounted trays are anchored utilizing heavy-duty, cure-dependent high-bond VHB (Very High Bond) tape, such as 3M™ VHB™. This method is simple to apply but has a critical limitation: it is a permanent bond with a mandatory curing timeframe.
- Preparation: The desk surface and the top of the adhesive mount must be wiped clean with a lint-free isopropyl alcohol pad to remove all oils and dust.
- Application: Apply the tape directly to the tray’s mounting brackets. Position the tray and press firmly for 30–60 seconds, applying maximum pressure to ensure the adhesive flows into all surface microscopic textures.
- The Curing Pause: This is the most vital step. You must now wait a mandatory 24-hour curing pause before adding any weight. Adding weight earlier will destroy the adhesive bond.
- Success Checkpoint: After 24 hours, apply slight downward force. If the tray feels securely “welded” to the underside, it is ready. This is an advanced technique best for lightweight trays (like mesh or slings) where drilling is undesirable.
Critical Design and Common Execution Failures to Avoid
Even with the best heavy-duty cold-rolled steel tray, failure to execute the proper structural design will destroy your components.
- Underestimating Total Volume and Safe Bending Radius: Forcing multiple thick monitor cables (HDMI, DP), dual heavy power bricks, and an ultra-wide surge protector into a narrow channel is a fundamental error. This causes cords to bend past their maximum safe radius, which is typically four times the outer diameter for data cables and much larger for power cords. Excessively sharp bends impede signal integrity and cause catastrophic mechanical damage to internal wires. A tray must maintain adequate room for cables to enter and exit with a safe, sweeping arc.
- Failing to Build Safe Structural Slack Loops for Standing Desks: This is the singular most dangerous error specific to height-adjustable desks. You must always plug, map, and tie your cable runs while your adjustable desk is raised to its absolute ceiling height. If you perform cable management while the desk is in its seated position, short data and power lines will have insufficient length when the desk rises, causing them to yank violently, destroying device ports or ripping the tray from its anchors. You must build a large, structured “slack loop” that hangs freely between the tray and the fixed wall power outlet, ensuring it can accommodate the desk’s full range of motion.
- Using Permanent Non-Reusable Zip Ties: Securely tying down cable bundles inside your new tray using permanent plastic zip ties is a major operational limitation. While they create a dense bundle, when you inevitably buy a new keyboard or swap a monitor, you are forced to carefully cut out the old ties, creating a massive risk of slicing your primary data cables or power cords. A superior solution is to pair your rigid metal tray with a comprehensive desk routing kit or premium reusable hook-and-loop straps (like Trilancer or VELCRO® Brand ONE-WRAP® Straps).
Strategic Guidelines for an S-Tier Workstation Layout
To deploy a definitive, authoritative setup, you must implement an “S-Tier” configuration that exceeds the functionality of a simple catch-all raceway.
- Map Data Over Power: When organizing your desk cable tray, maintain a logical separation where sensitive data lines (Ethernet, HDMI, USB) are routed in their own pathway, typically on a distinct plane or within a different section of the slotted metal tray than high-voltage power runs to prevent interference.
- Anchor the Power Strip Internally: Don’t let your heavy power strip slide around loosely inside the tray. When adjusting standing desk heights, a sliding power bar can snag other cables. Use a high-quality surge protector with wide outlet spacing and lock it firmly to the inner floor or side wall of your tray structure using heavy-duty double-sided foam mounting pads (like 3M™ Dual Lock™ or heavy-duty foam tape) or industrial-strength hook-and-loop.
- Minimize the Large Power Bricks: Whenever possible, eliminate the large, heavy power bricks from your setup. Advanced workstations use multi-port GaN (Gallium Nitride) chargers or advanced USB-C docking stations to centralize power delivery to multiple peripherals with a single, sleek unit, removing the physical burden on your tray and desk.
Frequently Asked Questions About Desk Cable Trays
Can I use a clamp-on tray with a glass-top desk?
Yes, a clamp-on desk cable tray is specifically designed for glass-top surfaces. Ensure your chosen model has soft rubber or felt padding on both the top and bottom of the C-clamp to protect the glass from pressure points or scratching. Ensure the desk can handle the added weight of the tray and cables.
Is a desk cable tray compatible with all types of standing desks?
While highly compatible, you must avoid installing the tray where it interferes with the specific collision sensors or crossbar mechanics of your standing desk, such as a dual-motor C-leg design. Always measure your standing desk’s maximum height and total weight capacity, ensuring your desk cable tray and its final weight load are accounted for in the desk’s load limit.
How do I size a tray for a specific number of monitors and power bricks?
As a definitive rule of thumb, one large 10-outlet surge protector and two monitors with their corresponding power adapters require a tray with a length of at least 23.5 inches and a depth of 6 inches. For every additional monitor or heavy power brick, add an additional 6–12 inches of length and prioritize the use of heavy-duty cold-rolled steel.
Can I screw a tray directly into a hollow IKEA LINNMON or LAGKAPTEN desktop?
Do not use standard wood screws on a hollow honeycomb structure like an IKEA LINNMON. Standard screws will not be secure and will tear through the paper core. To use this mount on a hollow surface, you must either find the solid particleboard internal edges to screw into or use specific high-density expanding anchor bolts designed for hollow cores. A superior no-drill option like a clamp-on tray or high-bond tape is recommended for this surface.